
Customizable Feedback form: how to create online? How to make a beautiful pop -up feedback form HTML and PHP with a phone and sending an order by e -mail?
Instructions for creating a feedback form on HTML and CSS, as well as a collection of ready -made forms and guide to connect and configure them.
Navigation
Today, any person who does not even has programming skills can easily create his own site by downloading a ready -made template from the network and installing it on the engine used.
However, not every ready -made template is able to satisfy the user's requirements. Many of them are represented in “cheese” form and do not have such important sections and functions as, for example, a feedback form.
This site block is extremely important for owners of online stores and large information portals. In our article you will find information on how to independently create a feedback form, where to download a finished template and how to install it on your website.
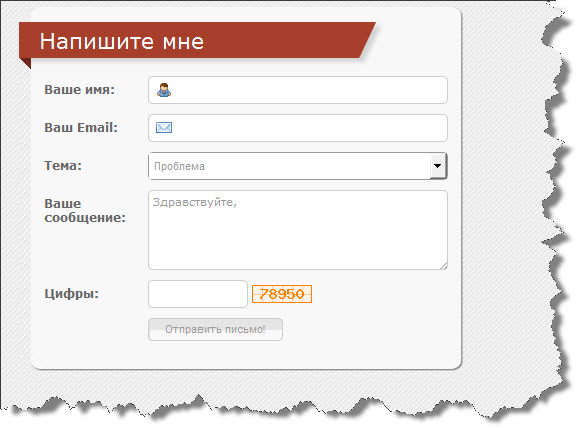
Figure 1. What is a feedback form and why is it so necessary?
What is a feedback form and why is it so necessary?
- One of the most important functions of any decent site is the feedback form. It serves for interaction between the visitor and the resource administration. So with its help you can write an appeal to technical support or send the necessary data to the administrations. For example, payment details in online stores or the name of the goods ordered. It is strongly recommended to have such a form on your portal, since constant contact with its visitors and customers is the key to its successful development.
The feedback form is a separate page or block (department), consisting of several fields of the text input and the “Send” button. As a rule, the standard form has the following fields:
- Full name
- E-mail (email address)
- Telephone number
- The addresses of your site
- Field for entering text message
However, the fields can be as much as you like, and they can be signed as you like. It all depends on your needs and imagination.
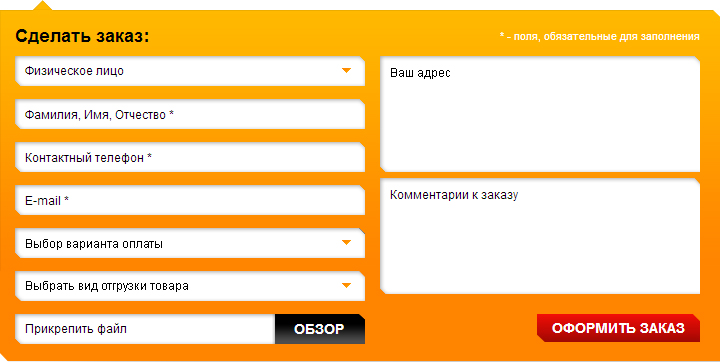
Figure 2. What is a feedback form and why is it so necessary?
- In addition, some owners add Google or Yandex cards to the feedback form, forms of entering the site using social networks “VKontakte”, “Facebook”, “Google+” and so on. But we will talk about creating the simplest form of feedback, for which you will need exclusively knowledge of the basics of the marking language HTML and nothing more.
How to create the simplest feedback form for the site on HTML and PHP?
In order not to turn the article into a full boring textbook, we will proceed from the fact that you are already familiar with the basics of the marking language HTML And you have a general idea of \u200b\u200bhow it works. If you do not have such skills, before taking up the creation of a form, it is strongly recommended to tighten your knowledge a little on a free resource htmlbook.ru. Otherwise, you can not only abandon this venture, but also spoil the code of your site.
To recreate the working form of feedback, you need three important elements, one of which is responsible for the marking and structure of the form ( HTML), the second for its external design ( CSS), and the third for processing and transmission of data ( PHP). Let's start in order:
Writing a HTML code for feedback
- Step 1. In order to indicate form in HTML Tag is used ‹Form› ‹/Form›. Inside it will be set sizes, styles and other vital properties of form. When recording the Tag itself, he needs to set a class to indicate, which will further help to install for the form CSS Styles.
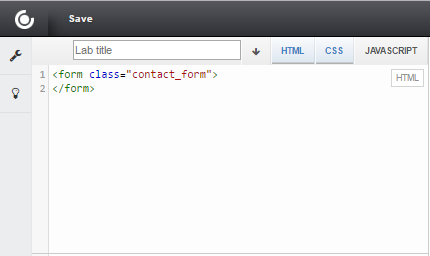
Figure 1. How to create the simplest feedback form for the site on HTML and PHP?
- Step 2. Further to create the first field of our form inside the tag ‹Form› You need to write block tag ‹P›which is responsible for creating a new line.
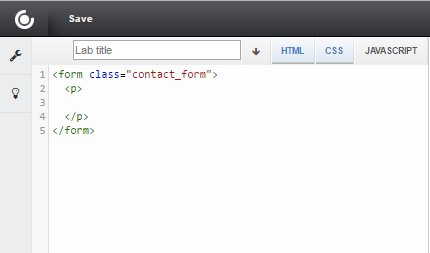
Figure 2. How to create the simplest feedback form for the site on HTML and PHP?
- Step 3. Inside Tag ‹P› From the new line we enter the following tag: ‹Label for \u003d" NAME "›Name ‹/Label›. He is responsible for the names of the future field of form.
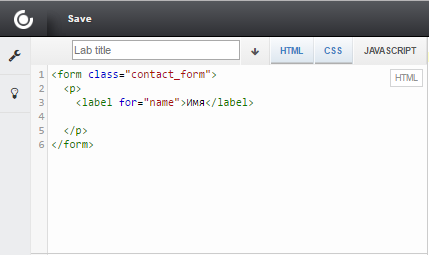
Figure 3. How to create the simplest feedback form for the site on HTML and PHP?
- Step 4. On the new line, everything is in the same tag ‹P› We prescribe the tag of creating a field with the following values: ‹Input Type \u003d" Text »Name \u003d" NAME "PLACEHOLDER \u003d"Enter your name »Required \\›. Parameter " type \u003d "Text"" Sets the type of text field, and the parameter " pLACEHOLDER \u003d "Enter your name «» sets the initial text in this very text field. Parameter " rEQUIRED»It makes it clear to the site visitor that this field is mandatory for filling out. As a result, you should get a form with one field, as shown in the screenshot below.
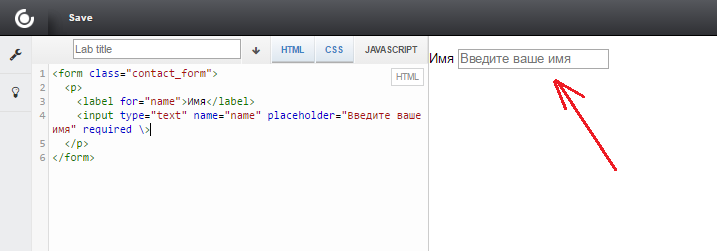
Figure 4. How to create the simplest feedback form for the site on HTML and PHP?
- Step 5. By the above example, add the remaining fields you need, each time starting from the tag ‹P›. To install a field with a text message, use tag ‹Textarea Name \u003d" Message "Cols \u003d" 50 ″ Rows \u003d "6 ″ Required› ‹/Textarea›. Parameters " cols" and " rows»Are responsible for the width and height of the text field. You can set the parameters that you like more. You should get something like that shown in the screenshot below.
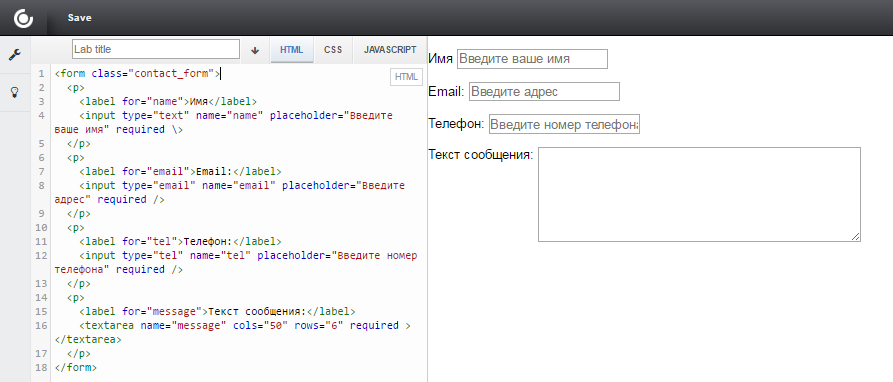
Figure 5. How to create the simplest feedback form for the site on HTML and PHP?
- Step 6. To protect yourself from bots, which are quite a lot on the Internet today, create another line with tag ‹Input Name \u003d" Bezspama "Type \u003d" Text »Style \u003d" Display: None "value \u003d" " /›. Due to the parameter " style \u003d "Display: None"»This field will not be visible by mere mortals, but the bots will be filled automatically. Thus, you can always distinguish a living person from the program.
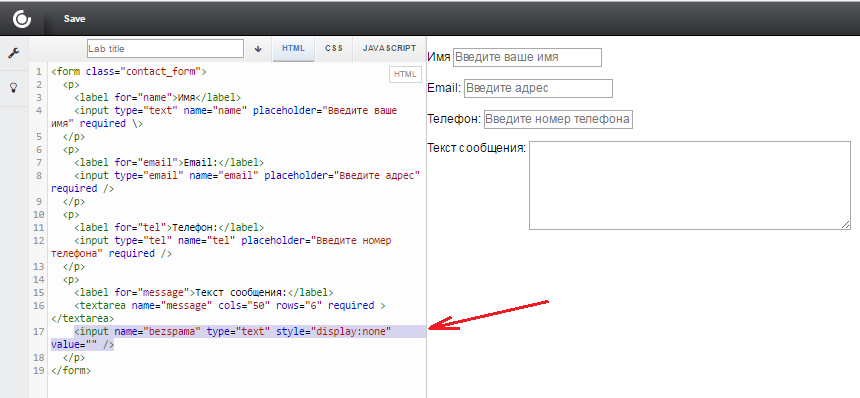
Figure 6. How to create the simplest feedback form for the site on HTML and PHP?
- Step 7. The final stage of the marking will be the creation of the Sending button. Tag is used for this ‹Button›. Create a new block ‹P› And inside it, enter the button code with the following parameters: ‹Button class \u003d" Submit "Type \u003d" Submit "›send a message ‹/Button›. A similar result should turn out, as shown in the screenshot.
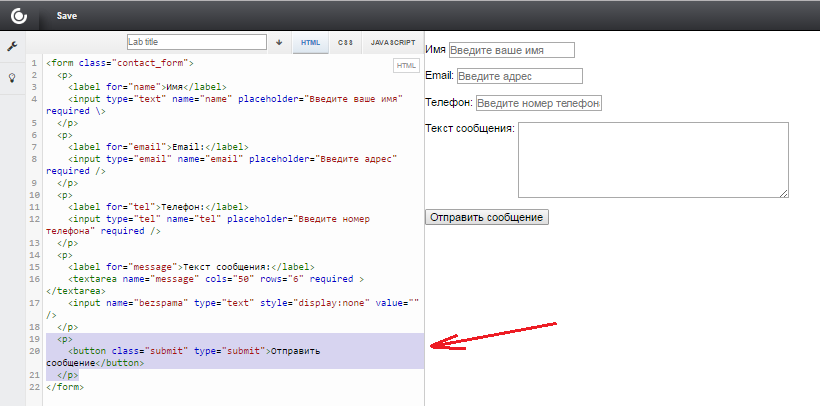
Figure 7. How to create the simplest feedback form for the site on HTML and PHP?
Working with cascading styles (CSS)
- As you have already noticed in the process of marking, we turned out something very crooked, nondescript and disgusting. In order to give the feedback form a more or less neat appearance, one language HTML It will not be enough. For this purpose, you will have to resort to the use of styles CSS.
- In the event that you took advantage of the advice to tighten your basic skills on the resource htmlbook.ru, then set certain design parameters for all parts of the form using CSS It will not be difficult for you. If you do not have a desire or time to mess with all this, then we will provide you with a ready -made code and tell you how to connect it.
Figure 8. How to create the simplest feedback form for the site on HTML and PHP?
Connect styles CSS to HTML You can two ways:
- Copy the code from our cascading table to the bottom of the file style.csswhich is present at the site hosting
- Move our styles file to your hosting and connect it
File style.css Connects inside the tag ‹Head› ‹/Head› Using a script ‹Link Rel \u003d" Stylesheet "Media \u003d" Screen "Href \u003d" Style.css "›. In the event that a file with styles lies not in the same folder as the main HTML file, then you need to specify the path to it. In our file with styles, each element has a designation. If you wish, you can change the parameters for yourself, guided only by basic programming skills.
PHP file connection and setting it
As mentioned earlier, the script PHP is responsible for the execution of the feedback form. However, in order to more or less understand the principle of language work PHP, you need to read a large volume of literature and spend a decent number of hours for practice. Therefore, as in the case of CSS, we will provide you with a ready-made file with a PHP script, which will only have to attach to the document with the form.
Unlike the file style.css, a file with a PHP script is attached in the properties of the form itself. Let's start in order:
- Step 1. Open the previously written code and find a line with an open form tag. Add properties to it " action \u003d "Contact-form.php"" and " method \u003d "Post"". Watch an example in the screenshot.
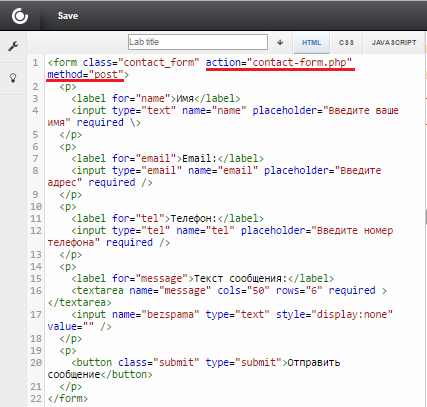
Figure 9. How to create the simplest feedback form for the site on HTML and PHP?
- Step 2. Download our PHP file and place it on the hosting in the same folder where the HTML document is located. Thus, PHP and HTML files will interact with each other.

Figure 10. How to create the simplest feedback form for the site on HTML and PHP?
- Step 3. Next, you need to configure the script for yourself. Open the file and set the variables, assigning them the same names as in the HTML script. If you added additional fields to the form, add them in the PHP script exactly as shown in the screenshot.

Figure 11. How to create the simplest feedback form for the site on HTML and PHP?
- Step 4. Next, you need to add two more variables with the address of your email and the topic of the letter that will be displayed on your box. In a line with a variable " $ Address"Indicate e-mail, and in the line" $ sub»The theme of the letter is shown in the screenshot.

Figure 12. How to create the simplest feedback form for the site on HTML and PHP?
- Step 5. In a line with a variable " $ ms»The format of the letter that you will receive by mail is configured. You can rewrite it unchanged or edit your own taste.

Figure 13 How to create the simplest feedback form for the site on HTML and PHP?
- Step 6. All other lines are responsible for sending the message and contain the settings of protection against bots, so they must be left unchanged. As a result, the full code should look something like that shown in the screenshot below.
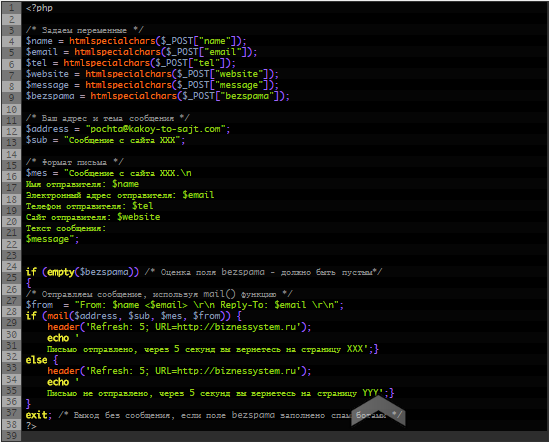
Figure 14. How to create the simplest feedback form for the site on HTML and PHP?
Download CSS and PHP files for feedback
After performing all the actions at the output, you will receive such a simple neat feedback form
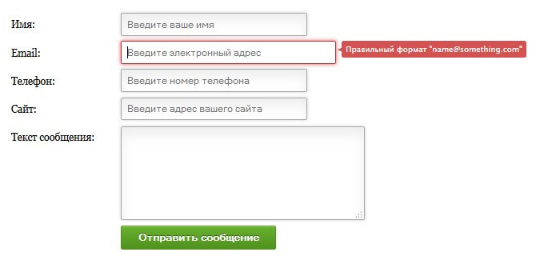
Figure 15. How to create the simplest feedback form for the site on HTML and PHP?
A selection of beautiful design forms of feedback on HTML and CSS for different purposes
- Based on the above instructions, you can easily “draw” the feedback form to your own taste. However, if you do not have time or desire to create a form from scratch yourself, you can find ready -made design forms on the Internet and have basic skills HTML edit them for yourself.

Figure 1. A selection of beautiful design forms of feedback on HTML and CSS for different purposes
- Having searched a little, we found for you a selection of 35 beautiful pop -up design forms of feedback, which are written on HTML and CSS. These forms are suitable for engines such as WordPress and JoomlaThey have a simple and light settings from the control panel, and are also perfect for sites without an engine.
Download a selection of designer forms of feedback for sites

Hello. After clicking on the sending button, such a message.
Warning: Cannot Modify Header Information-Headers Alread Sent by (Output Started at /home/u345/domains/1kontakt.ru/public_html/contact-form.php:1) In/home/u35/u35) in/u35/u35/u35/u35/u35/u35/u35/u35/u35/u35/u35/u35/u35/u35/u35/u35/u35/u35/u35/u35/u35/u35/u35s ru/public_html/contact-form/contact-form.php on line 30
The letter is sent, after 5 seconds you will return to page XXX
The letter does not come.
And redirecting to the page also does not occur.
Yes, the form is really cool, but I do not have enough knowledge to understand all this code. So far I have found a service for generating FormDesigner forms. In a few minutes I made a similar shape. I recommend to everyone who is incurred in programming this service!