
How to enable and configure Wi-Fi laptop?
This article will tell you about the ways to include and configure the Wi-Fi network on the laptop.
Navigation
In this article we will tell the following: How to enable and configure Wi-Fi on a laptop?

Typically, the inclusion of Wi-Fi wireless network takes only a few seconds, but if you bought a new laptop, then it is unlikely that it is possible to turn it on in a few seconds. After all, as you know, each manufacturer wants to make its own adjustments and innovations, and does this through a change in design, style, as well as the location of the keys and buttons.
Is it possible to turn on Wi-Fi on a laptop using a button?
Of course it is possible, and this is done by just one click on the key, and which one exactly it is necessary to press for this, depends on the manufacturer this laptop model.
But we have given a list of the most popular manufacturers, as well as Wi-Fi inclusion options:
- Asus - the wireless network is turned on and disable by combining keys FN + F2
- On laptops from manufacturers Acer and Packard Bell This can be done using a combination of keys FN + F3
- HP - turning on and disconnecting the wireless network is carried out by a touch button, which shows the antenna, but some models require clicking FN + F12
- Lenovo -You can turn on and disable Wi-Fi through the key combination FN + F5
- Samsung - can be turned on using a combination of keys FN + F9or FN + F12
But still there are models that have their own special button for turning on and disconnecting Wi-Fi. Therefore, if the above key combinations did not help you, then you should read the instructions for using your laptop, where Wi-Fi inclusion methods will clearly be described.
Turning on Wi-Fi through the buttons remains unsuccessful, what to do?

If you investigated all the buttons on your laptop or did not find the appropriate button for turning on and disconnecting the Wi-Fi wireless network, it is likely that this operation on the model of your laptop can be performed by switching a special button.
It is usually located in the end area of \u200b\u200bthe laptop, or on the sides.
It is worth notingthat the search for a special button is desirable to produce in good lighting, since it is very much drained with the color of the laptop case, or to make a tactile search, then try to feel the button with your fingers.
The button can have such an inscription as Wirelessor Wlan, and in some cases it has no inscriptions at all.
Attention! Thoroughly inspect the entire area and surface of your laptop, since this button can even be in the most unexpected place, for example, if the laptop models that have a switch to turn on and disconnect the Wi-Fi wireless network are under the lid that must be opened, and If the laptop is new, then unscrew the bolts, and then open. This is how the manufacturers of laptops “play” the mouse with us, trying to hide the next and very important button in function.
How to configure Wi-Fi on a Windows 7 laptop?
Before starting the settings, it is still worth make sure that there are appropriate driverswhich are designed for the correct operation of the adapter on your operating system.
A check for the presence of a driver should be carried out in any case, even when you install the drivers on the sound card.
What needs to be done to check if there is a driver on a laptop?
- First of all, you need to go to "Control Panel"
- Then you need to find in the list "Device Manager"which is usually hidden in the tab "Equipment and sound"
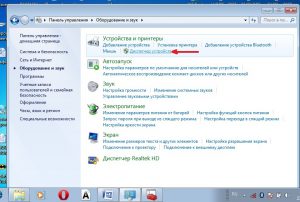
- Now you will notice that a window with various devices has opened, but we need to find and click on the tab "Network adapters". With the correct installation and correctness of the software and drivers, you must have two points, namely Ethernet and Wi-Fi
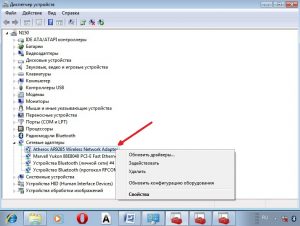
- If on the list "Network adapters" There is no point Wi-Fieither opposite its name there is a sign «!», then this only means one thing that you have incorrectly installed drivers, or not installed at all
- To install drivers for Wi-Fi, You need go to the site of the manufacturer of your laptopAnd find the corresponding drivers there.
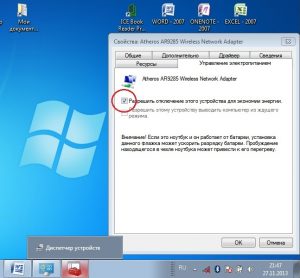
- To remove «!» opposite the driver, you need to click on Wi-Fi with the right mouse buttonand press "Enjoy", the reason for this will be the fact that you have a regime for saving electricity, in connection with which the adapter does not work
- You can disable this mode using the parameter "Power management"where necessary remove the mark from the pointwhich you will see below
Well, now everything is fine with the drivers, which means their work will be done as it should.
- Now the question concerns the inclusion of Wi-Fi adapter. To turn it on, you must again go to "Control Panel", select the tab "Network and Internet"and then go to "Network connections"Where we find "Wireless network connection" and turn on the adapter using the right mouse button
If you did everything right, then in the taskbar you will see an image in the form of antennas, on top of which a “snowflake” will be depicted
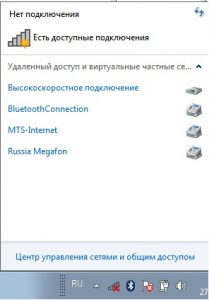
If the network has a password protection, then she will ask him to introduce him, to connect to it. Only after entering the correct password can you connect to the corresponding network.
Well, on this we will finish today's article, which describes ways to include and set up Wi-Fi wireless network on a laptop from different manufacturers, but with the Windows 7 operating system.
Video: How to enable and disable Wi-Fi wireless network?