
How to increase microphone sensitivity on android?
Overview of methods for increasing the sensitivity of the microphone on devices running the Android operating system.
Navigation
With the problem of low sensitivity of the microphone today, both users of personal computers and owners of mobile devices (smartphones, tablets) may occur. And if on the computer, even an inexperienced user is able to easily figure out the sound card settings and increase the sensitivity of the recording device, then not everyone knows how to make a similar operation on a mobile device.
In our article you will find two ways to increase the sensitivity of the microphone on smartphones and tablets based on the operating system Android.

Image 1. Improving the microphone sensitivity level on Android devices.
How to increase microphone sensitivity on android?
- Before moving to changing the level of sensitivity of the recording device on your gadget, it will not be superfluous to say a few words about the methods of implementing this action. It is possible to execute it using the standard Menu of the engineer built into the operating system Android Or with the help of specialized applications.
- The first method is preferable, since you will not need to set third-party software and clog the memory of your phone or tablet. However, on individual devices, the engineer menu can be blocked and, in this case, nothing remains, how to resort to the second method.
IMPORTANT: Whatever the method of adjusting the microphone you have not selected, we strongly recommend that you memorize all the actions produced, as well as write down the default volume values \u200b\u200bso that you can return your device to source settings as necessary.
How to increase the microphone sensitivity on android through the engineer menu?
On some models of devices, enter the engineer menu through its basic settings. However, in most cases, it is necessary to dial special for this purpose. USSD command and click the button " Call" List of commands to enter the engineering menu on different devices you can see in the figure below.
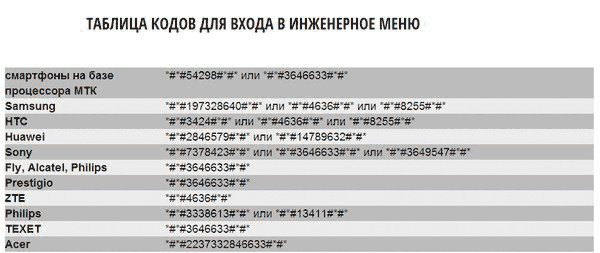
Image 2. USSD commands to enter the engineer menu on a variety of Android devices.
If your device is not listed in the list, you can find USSD command To enter the engineer menu on the model of your device using the search engines Yandex. or Google.
Step 1.
- As soon as you entered the engineer menu, the first thing you need to study its interface. On devices of various models, it may look different, but there are no special differences in its structure and variable parameters.
- Next you need to find and go to the " Audio.».
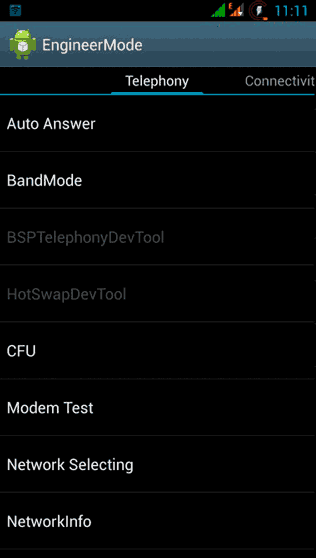
Image 3. The entry process in the engineer menu.
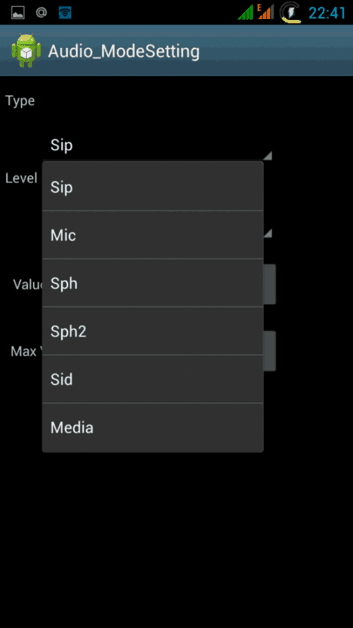
Step 2..
- All audio settings are displayed on the screen of your device, including the microphone, standard speakers and peripheral devices. First you need to figure out which setting for what is responsible:
- Normal Mod. - settings of the device in active mode (all peripheral devices are disabled from the device, the headset type);
- Headset Mod. - settings of the device with a connected headset or columns;
- Loudspeaker Mod. - Parameters of the speakerphone (the mode is automatically activated when the speakerphone is turned on at the time of the conversation);
- Headset_loudspeaker Mod. - Parameters of speakerphone. (mode is activated manually at the time of the conversation when the headset is connected);
- Speech Enchancement - device settings in the process of a normal conversation without activating the speakerphone and the connected headset;
- Debag Info. - section contains backup data to restore device parameters;
- Speech Logger. - The section contains information about incoming and outgoing challenges of the device;
- Audio Logger. - Built-in sound recording software supporting searching, quick start and saving;

Image 4. Description of the menu modes.
- The last three sections touch ultimately not recommended. It will never be useful to the ordinary user, and in case of changing any parameters in them, you can cause the operating system failure and disrupt your device's performance.
Step 3..
- All other partitions have a rich assortment of sound settings, which cannot be reached through the standard device menu. Opening any of them, you will see the following abbreviations on the screen of your device:
- SIP. - online call settings;
- MIC - recording / microphone settings;
- Sph, Sph2. - parameters of device speakers (main and optional);
- SID - These parameters add a call distortion during the conversation process. In case of their change, the caller will hear itself instead of the interlocutor. Change at your discretion, but we would recommend to leave the default values;
- Media. - Music and video playback volume settings;
- Ring - settings of incoming calls;
- FMR. - Radio volume settings;
Step 4..
- Choosing one of the above settings (to configure the microphone, this " MIC") The window with the settings themselves appears before you. The very first graph settings " Level."Responsible for the volume level of the selected device or, in the case of a microphone, for its sensitivity. User Vain Select one of the seven available modes. Mode " 0"Is the most quiet, and the mode" 6"It is considered the biggest.
- For more accurate volume setting, the graph is used " Value." In the corresponding field, you can enter a value from 0 to 255, then press the button " SET.»To save parameters.
- Count " Max Vol."Is responsible for the maximum volume of the audio device and is tied to the column" Level." Its values \u200b\u200bdo not touch.
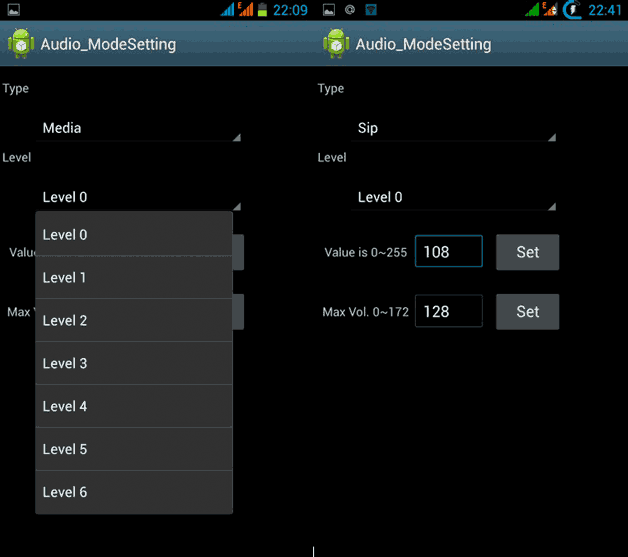
Image 6. Description of the microphone sensitivity setting and other Android audio parameters.
Important: It is strictly not recommended to set values \u200b\u200bto the maximum. Thanks to this, the recording and playback of sound can quickly wear out and fail.
After you have mastered the principle of operation of the engineer's menu, you can easily configure the parameters of your device under yourself. The sensitivity of the microphone during conversations can be enhanced on the tab " Audio." In chapter " Normal Mod."By selecting the parameter" MIC"And asking him the necessary values.
Microphone sensitivity setting for voice recorder is also carried out on the " Audio.", But in the section" Loudspeaker Mod." Select the option " MIC"And in the same way, ask him the necessary values. After each change of values, do not forget to click on the " SET."To save. After all the changes made to restart your device so that they entered into force.
How to increase microphone sensitivity on android using third-party applications?
In the event that you could not find the right USSD command For your device, or could not get into the engineer's menu for some other reasons, then from the store Google Play Market. You can download one of the numerous applications that give access to the hidden settings of the operating system. Android. Many of them require root-Rightso we recommend using the application Mobileuncle Tools., download which you can of this link.
The transition to the engineer menu through this application is as follows:
Step 1.
- Implement and start the application Mobileuncle Tools., After that, activate the developer mode.
- In the first window you need to find and go to the " Engineer Mod.».
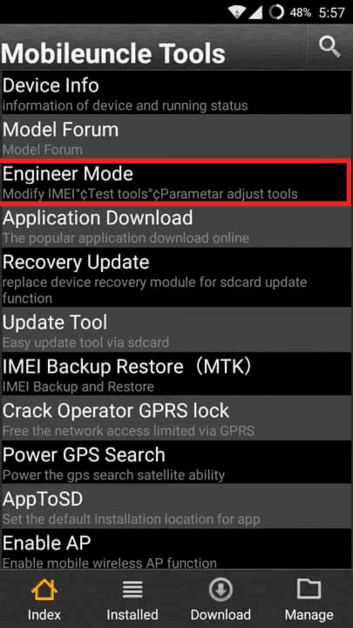
Image 7. Input in the engineer menu through the application.
Step 2..
- Next, you will appear the engineer menu, where you can adjust the sensitivity of the microphone on the principle described above.
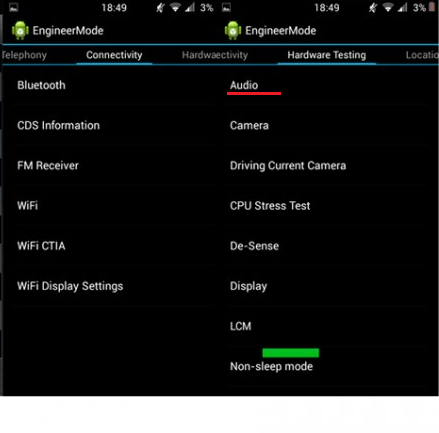
Image 8. Engineer unlocked through the application.
Step 3..
- You can also use a free app. VOLUME +.. It does not require root rights and with it can increase the sensitivity of the microphone and speakers, without entering the engineer menu.
- Download App, install and run it. Click the " Setting the headset».

Image 9. Microphone setting through the VOLUME + application without an engineer menu.
Step 4..
- Next you need to switch to the section " Simple volume amplification"And using the switches displayed at the bottom of the window, set the appropriate parameters for your headset.
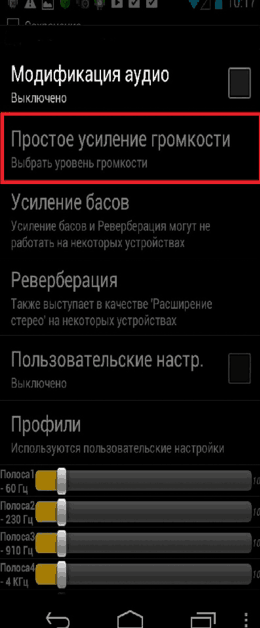
Image 10. The moment the sound setting through the VOLUME + application.
Thanks to the methods described above, you can adjust the sensitivity of the microphone on your Android device to the desired level. If suddenly they do not work, then, most likely, the reason lies in the physical malfunction of your device or in low microphone power. In the first case, it makes sense to ask for help at the nearest service center, and in the second, think about buying a new device with a more powerful "hardware".