How to install or reinstall Windows 7 on a netbook from a flash drive? Installation Windows 7 on a netbook via BIOS from flash drives: instruction manual
Detailed Windows 7 disk writing guide on a USB flash drive and step-by-step instructions for installing the operating system on a netbook via BIOS.
Navigation
Operating system Windows 7. is considered one of the most successful products of the corporation Microsoft.. Despite the fact that the more fresh and no less successful appeared Windows 10.Many users are in no hurry to give up the "seven", as it requires a smaller number of system resources and is great for weak computers.
As a rule, to acquire a disk with a licensed version Windows 7. - not a problem. The trouble is that to establish an operating system from it to a netbook, which does not have a drive, simply impossible. The only option remains recording the operating system image on a USB flash drive or an SD card.
From our article you will learn how to write the image Windows 7. on the flash drive and how to carry out the installation of the operating system on the netbook through it Bios..

Image 1. Instructions for installing Windows 7 on a netbook via BIOS from a flash drive.
How to install or reinstall Windows 7 on a netbook from a flash drive via BIOS: Instruction
Users who have never had to install operating systems from flash drives or memory cards, initially may consider this task too difficult for themselves. But we hurry you to assure that this process is practically no different from the usual installation. Windows 7. from the disk. The most important thing is to properly prepare. To install, you will need the following components:
- Distribution of the operating system Windows 7.;
- Specialized program, with which the image image is recorded to removable media will be recorded;
- Basic PC user skills;
For all major manipulations in the installation process will be answered. You can only need to put in front of them the corresponding tasks. Presented in our article Installation Guide Windows 7. It will help you to install the operating system on any model of a netbook from any manufacturer. So, proceed.
Selection and download of a suitable Windows 7 distribution
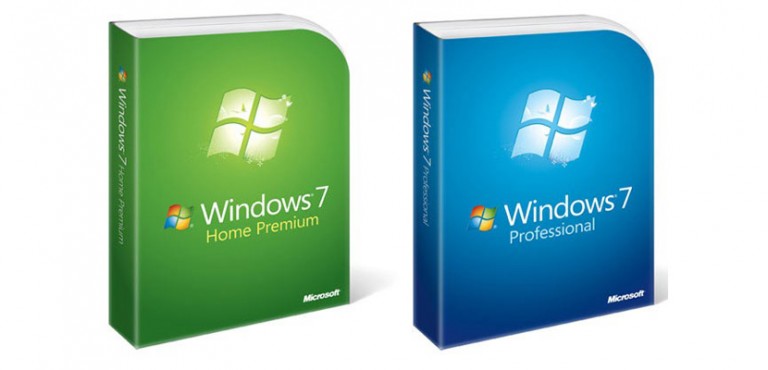
Image 2. Selection and download of the appropriate Windows 7 distribution.
- First and main component for installation Windows 7. is the image of the operating system disk. On the the official website of Microsoft. Users are allowed to download yourself one of these images for an entry on the USB flash drive. However, before downloading the distribution Windows 7. You need to prepare the activation key that is needed to register the operating system and obtaining a license. Without activation key, you will not be able to install the licensed version. Windows 7..
- If you do not have the key activation, then there is an opportunity to buy it on the Internet or in the store. If you do not want to spend money, you can download a pirated copy of an operating system disk image on one of the numerous torrent trackers. For example, good custom builds come across the site mainTracker.org..
- Do not rush to download the first disk image. In order for you in the future, you do not have any trouble with the operation of the operating system, we strongly recommend avoiding user assemblies where extraneous programs and user system configurations are implemented. For correct work Windows Best download "Clean" image of the operating system. To find such, carefully read the description of the distribution and custom reviews.
Preparation and creation of bootable flash drive
After you downloaded a suitable distribution Windows 7.it's time to write it on a USB flash drive or an SD card, the volume of which should be at least 4GB. Recording a disk image to removable media is carried out using specialized utilities. On the Internet, they can be found a great set, but the simplest and most convenient, in our opinion, is the program Rufus.. You can download this program with official Site Developer.
Important: Remember that in the process of creating a loading flash drive, it will be completely formatted and all data from it will be deleted. If important documents are stored on your removable drives, transfer all the valuable folders and files to the hard disk or other removable media before recording.
To burn a disk image to removable media, do a few simple steps:
Step 1.
- Insert the pre-prepared removable media into the computer, after which downloadInstall and run the program Rufus..
- In the column " Device»Select your USB flash drive or SD card from the list, to which the image will be recorded. Windows 7..
- In the other three lines, leave the default values.
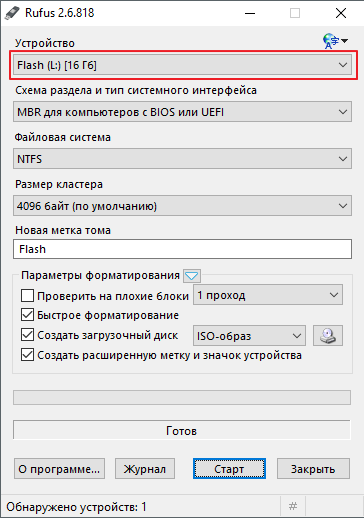
Image 3. Selecting a device for recording an operating system disk image.
Step 2..
- In chapter " Formatting parameters»Specify the type of your distribution Windows 7.. It may have a format ISO., MDF. or even RAR.
- By clicking on the drive icon, find and select the accumulated image of the operating system in advance.
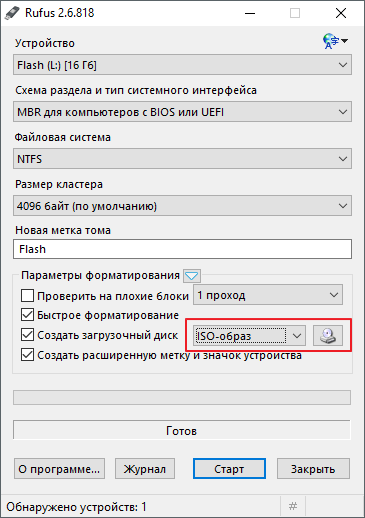
Image 4. Setting the removable media formatting parameters.
Step 3..
- Put the ticks opposite the three last lines, as shown in the figure below.
- After installing the tick in front of " Create boot disk»Two installation options will appear Windows. Highlight " Standard installation of Windows"And click" Start».
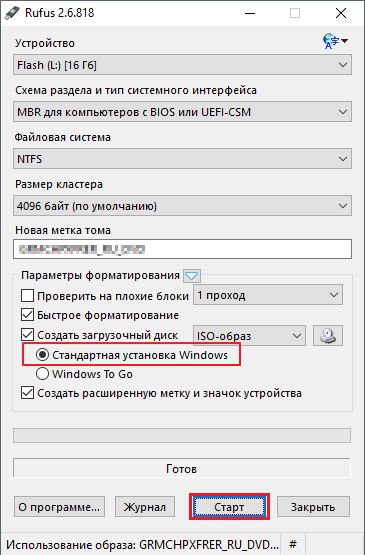
- Wait for the process of writing the image recording and proceed to the next section of our article.
Configure BIOS to download from a flash drive
After the boot flash drive was created, you must set the computer download settings from the flash drive in BIOSE. If you ignore this step, then the PC does not recognize the device and will download the already installed operating system as usual.
To get in Bios. You can by pressing a specific key on the keyboard almost immediately after the PC is turned on. On laptops and netbooks of different models and default grades, different keys or key combinations can be installed for the entrance to Bios.. Most often keys are assigned. Delete., F2. or Escape., however, there are exceptions. On the table below you can see the key combinations for the entrance to Bios. On different models of laptops and netbooks from different manufacturers:

Image 6. Table with key combinations for the BIOS entry on various laptops and netbooks.
There are several versions. Bios.However, the download priority setting of the download priority is almost the same in each of them. This setting should be in the section, in the title of which appears the word " Boot." So to customize Bios. To download from a flash drive, you need to perform a few simple actions:
Step 1.
- Restart the computer and log in to Bios.Using a key or key combination suitable for your PC (often a hint appears on the monitor with the name of the input keys).
- A signal that you entered into Bios. There will be an appearance of this window on your screen.
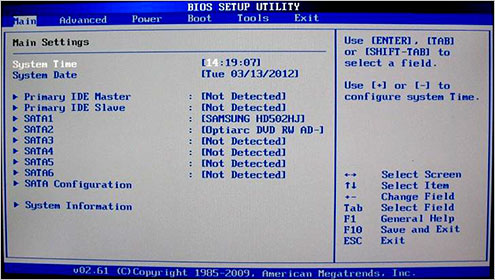
Image 7. Entry to the BIOS and start setting.
Step 2..
- Use the keyboard arrings to go to the " Boot."And find the section in the list" Boot Device Priority." Log in to it using the key ENTER».
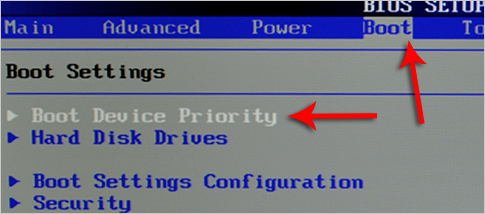
Image 8. Search for the required section in the BIOS.
Step 3..
- You will have a list of your devices, among which your USB flash drive should also be. If it is there, then stand up the arrows on the first line, click " ENTER", In the window that opens, select your flash drive and click again. ENTER».
- Thus, you will specify a high priority flash drive, and now the computer will be downloaded in the future from it.

Image 9. List of devices connected to a computer and priority for a flash drive.
Step 4..
- If there is only a drive and hard disk in the list, and the flash drive is missing, go back to the "button" ESC"And go to the" Hard Disc Drives.».
- Your flash drive should be in the second line. Arrogments Stand on the first line, click " ENTER"And in the appeared window, select your flash drive.
- After that, repeat step 3.

Image 10. Installing a computer boot from a flash drive in the BIOS.
Step 5..
- All the necessary settings are set and remains only to save the changes. To do this, click " F10"And in the winding window, click" OK.».
- The computer will go on a reboot.

Image 11. Saving changes and exit from BIOS.
Installing Windows 7 on a netbook through bios from a flash drive
If all the steps have been done correctly, then after restarting the computer, the data will be read from the flash drive. The signal will serve the appearance on the monitor here such as inscriptions and strips:

Image 12. Running Windows 7 installation.
After disappearance, the download strips will start setting Windows 7.. You will need to perform the following steps alternately:
Step 1.
- After a short period of time on the monitor, the starting window of the installation will appear Windows 7.where you must specify language settings for the operating system, temporary format, monetary units and keyboard layout language.
- After selecting the options are required, click the left mouse button on the button " Further"And in the next window, click on the" button " Set».
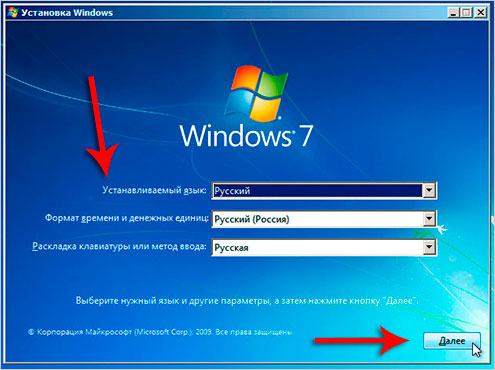
Image 13. Select a language pack and start installation of Windows 7.
Step 2..
- At the next stage, you will need to agree with the terms of the license agreement, click on the button " Further"And in the new window that opens, select the item" Full setting».
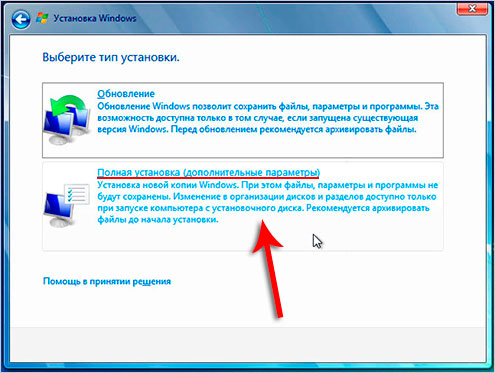
Image 14. Select the type of installation of the operating system.
Step 3..
- The monitor will display a window with a list of hard disk partitions and the actions buttons that you can apply to them. You will need to highlight the section to which your new operating system will be installed.
- The section on which an old copy of the operating system is marked as systemic. Install a new copy Windows 7. Best of all just at him. Setting the OS to another section, you eventually get two copies Windows.
- Highlight the system partition and click on the button " Format" This action will remove the old copy Windows And all stored in the data section.
- If you do not want to delete an old copy WindowsYou have the right to refuse to format a section. In this case, all the data of the old OS will be saved in the folder Windows.old. on the system disk. But it is best to put the operating system into a clean partition.
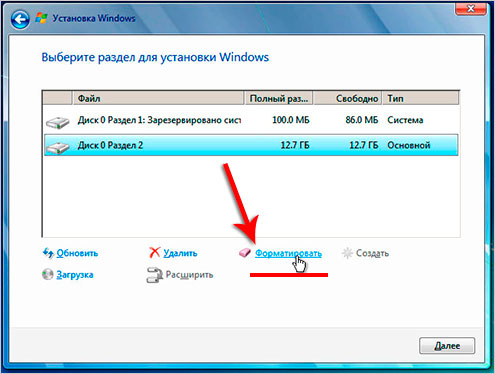
Image 15. Selecting a partition to install the operating system and start the formatting process.
Step 4..
- After completing the disk formatting, select the section to install and click on the "button" Further».
- A window will appear on the monitor, where the main information on the installation will be displayed. Windows 7.. For 15 – 20 Minute installation program will unpack and write the operating system files to the hard drive, install components and update packages Windows.
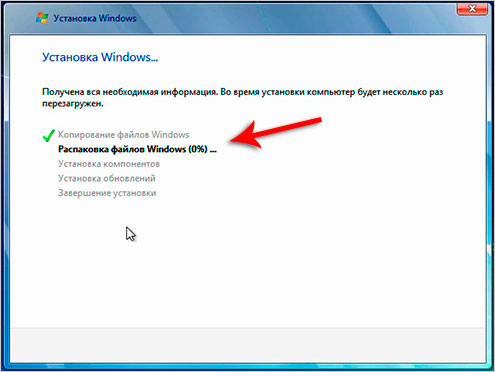
Image 16. The beginning of the main process of installing the operating system.
Step 5..
- After the installation is completed, the program displays the notification on the screen that the computer will be rebooted through 15 seconds.
- As soon as the computer rebooted, remove the flash drive From a USB port! In case of ignoring this action, the computer can start installing the operating system from the very beginning.
- After loading a PC on the monitor, a notification will be notified that the installer updates the registry parameters. Wait for the completion of this process.

Image 17. Installing and configuring additional components of the operating system.
Step 6..
- Finally, a window will appear where you want to specify the parameters for the administrator account and enter the name of the computer. Specify the computer name and click on the "button" Further».
- You will be asked to install a password for the administrator account. You are free to ignore this step by clicking on the button " Further».
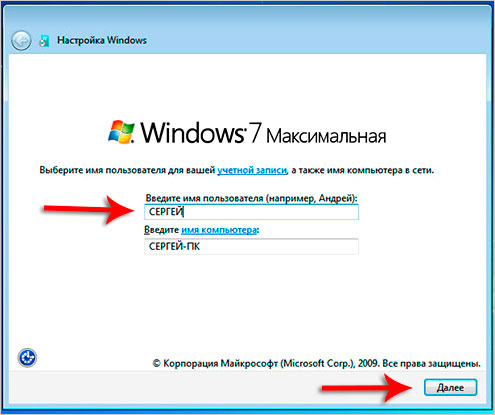
Image 18. Beginning of the Administrator Account Settings.
Step 7..
- At the next stage, you will need to enter the activation key. Windows 7.. If you have it, enter it into the appropriate field.
- If the key is absent, remove the checkbox from the string " Automatically activate Windows when connected to the Internet"And click on the button" Further».
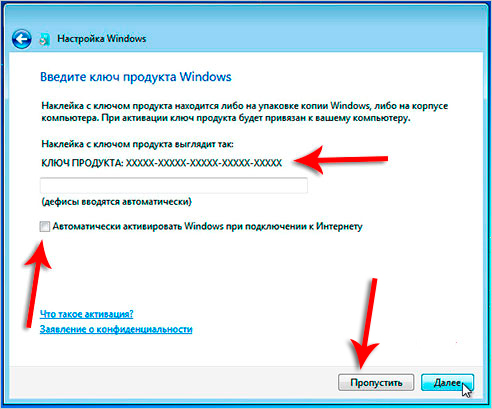
Image 19. Activation of a license of Windows 7.
Step 8..
- At the next stage, you will need to set protection settings. Windows. In the event that you are inexperienced PC users, we advise you to choose the item " Use recommended parameters».
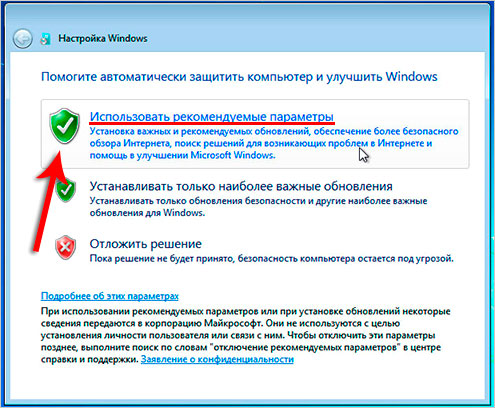
Image 20. Setting the operating system protection settings.
Step 9..
- Next, you will need to first select your time zone, and then set the Internet settings. We recommend choosing the item " home network».
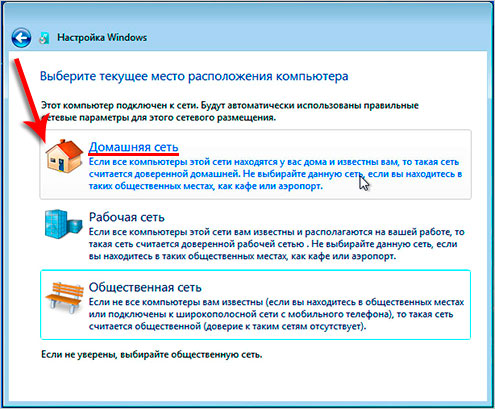
Image 21. Setting time, dates and Internet for the operating system.
Step 10..
- Congratulations! You installed yourself Windows 7. From a flash drive to your netbook. Now you can switch to the design of the desktop, setting the required parameters and start using the operating system fully.
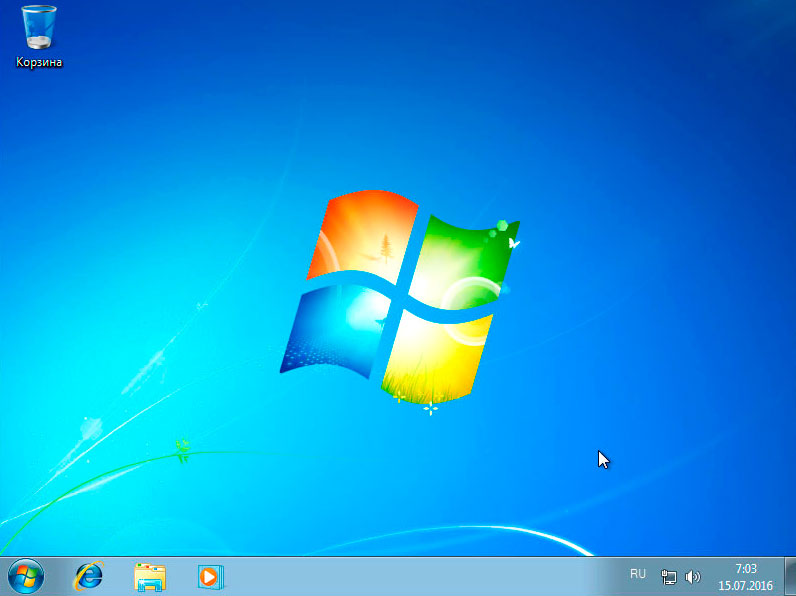
Image 22. Completing the installation and the start of using the Windows 7 operating system.
We remind you that this method of installing the operating system is suitable for both fixed computers and laptops / netbooks from manufacturers ASUS, Samsung, Lenovo., Acer. And everyone else.

Rufus does not save, the installer continues to require the DVD-ROM driver and refuses to continue the installation.