How to put Windows 10 from a flash drive on a laptop: step by step instructions. Installing and reinstalling licensed windows 10 from a laptop flash drive: Detailed instructions
Detailed guide to create a bootable flash drive of Windows 10 and installing the licensed operating system.
Navigation
To date Windows 10. It is the most new and convenient operating system from the Windows family and it is her preference to prefer most users of personal computers.
There are several ways to establish this operating system to your PC, but in our article we will look at the most universal of them, which is suitable for both stationary computers and netbooks and laptops. Namely - installation of the operating system Windows 10. from a USB flash drive.

Image 1. License Windows 10 Installation Guide on a laptop from a flash drive.
How to put Windows 10 from a flash drive on a laptop: step by step instructions. Installing and reinstalling licensed windows 10 from a laptop flash drive: Detailed instructions
Until December 31, 2017 any user of operating systems Windows 7. and 8.1 could update free Windows 10. Through the update center. However, this opportunity is not available today and, if you want to become the owner of the licensed "dozens", you will have to give it a small amount. At the time of writing the article on the official website of Microsoft. For a license Windows 10 Home. Request the amount of B. 8 699 rubles.
To install the Windows 10 operating system, you will need the following:
- Presence of removable media (USB flash drive or SD card), no less than 8 GB;
- Stable connection to the Internet;
- Sufficient hard disk space for downloaded files;
- Installed operating system Windows 7. or more fresh;
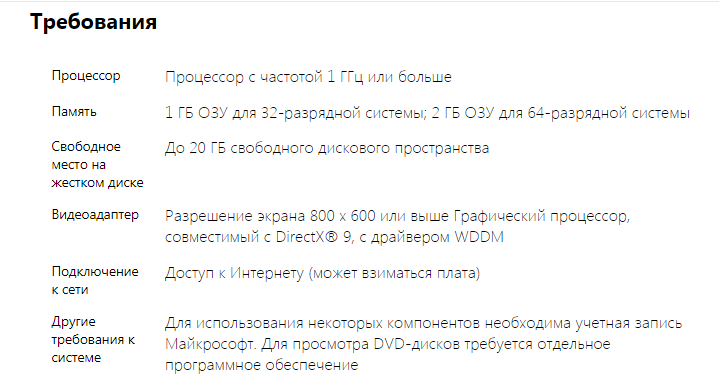
If all of the above you have, and your laptop meets the minimum system requirements Windows 10.which are shown in the figure below, then you can switch to the creation of a boot flash drive and directly to the installation of the operating system.
Creating a Windows 10 boot flash drive
On the Internet there are many utilities designed to record boot images on USB flash drives, DVDs and other removable drives. However, to create a boot flash drive Windows 10. It is best to take advantage of the official utility from Microsoft.which will do all the work independently. You can only select the operating system language, its release and discharge. The program does not require installation, but you can download it by of this link.
Creating a loading flash drive with its help is as follows:
Step 1.
- Download And run the downloaded file.
- You will open the window with a notification of the preparation of the program and after the text of the license agreement will appear, with which it is recommended to carefully read and click on the button " To accept».
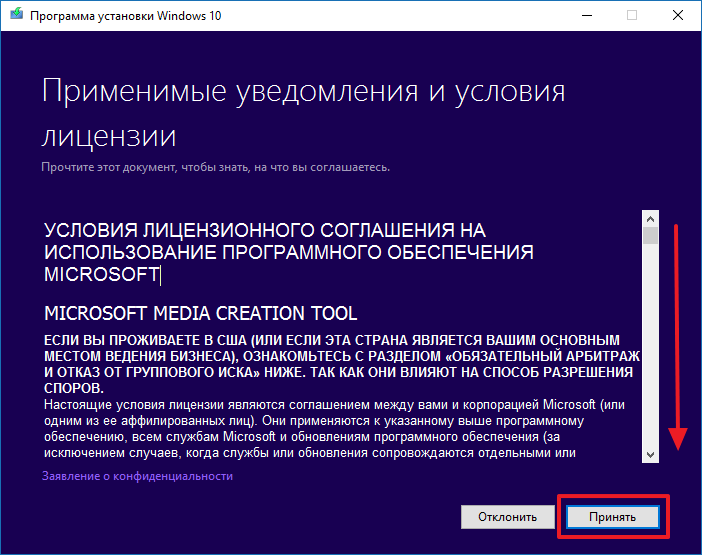
Image 3. Starting a program to create a boot flash drive.
Step 2..
- After a short time, the window will be updated and a request for the choice of action will appear in it.
- You will need to mark the marker Create an installation media for another computer"And click on the button" Further».

Image 4. Selecting action for the program.
Step 3..
- At the next stage you will be asked to choose the characteristics of the operating system installed. By default, they are in inactive condition.
- To fix it, you need to remove the marker from the string " Use recommended parameters for this computer", After which you choose the main language of the operating system, its output and discharge ( 32 or 64 bit).
- To continue, click on the "button" Further».

Image 5. Select the characteristics of the operating system.
Step 4..
- In the new opening window, the program will prompt you to choose where to record the system image.
- You can download the ISO file that can later write onto a DVD or a USB flash drive to a DVD or a USB flash drive, and you can create a bootable flash drive immediately, marking a marker " USB flash memory device"And clicking on the button" Further».
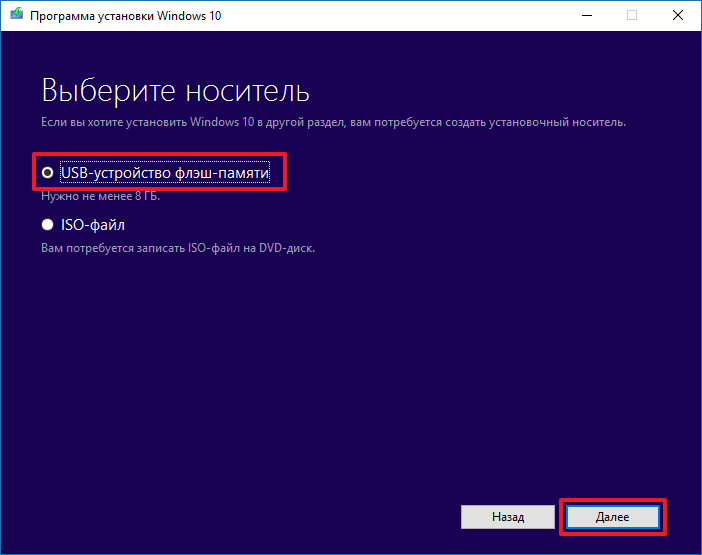
Image 6. Selecting a way to write image.
Step 5..
- In the next program window, you must select from the list of the USB drive to which you plan to write the image of the operating system.
- If you have not inserted your flash drive to the computer, then do it and then click the link " Update disk list"So that the new flash drive is detected by the program.
- To continue, click on the "button" Further».
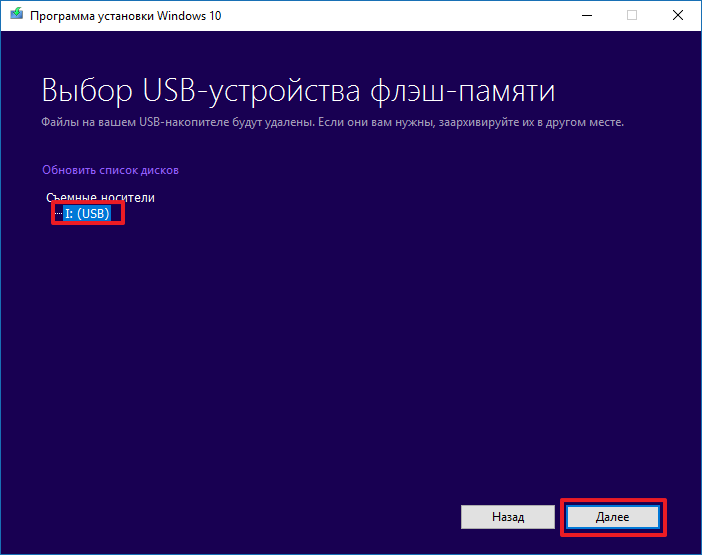
Image 7. Select flash drive to write image.
Step 6..
- The utility will run the process of downloading the image from the server Microsoft.will weigh from 4 to 7 GB, depending on the parameters you choose. In the process of downloading, you can freely use the computer, but do not break the connection to the Internet.
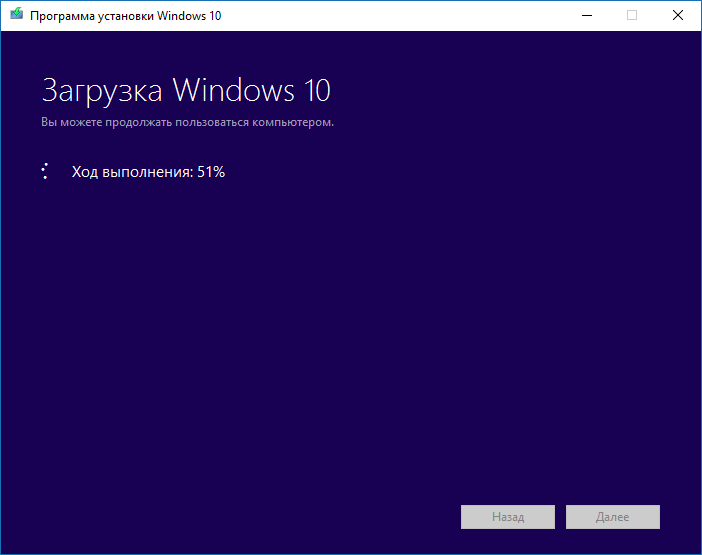
Image 8. Beginning of the image of the image from the Internet.
Step 7..
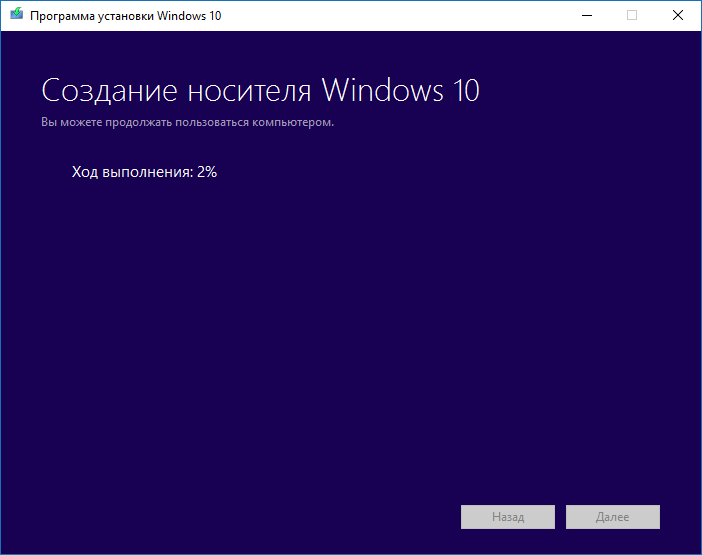
- Once the download is completed, the utility will start checking the downloaded image to integrity. Immediately after the verification is completed, the image recording process will begin to your USB flash drive, which will take 10 - 15 minutes.
Step 8..
- After the recording process is completed, the program will notify you that the loading flash drive is created. Click the "button" Ready"And close the program.
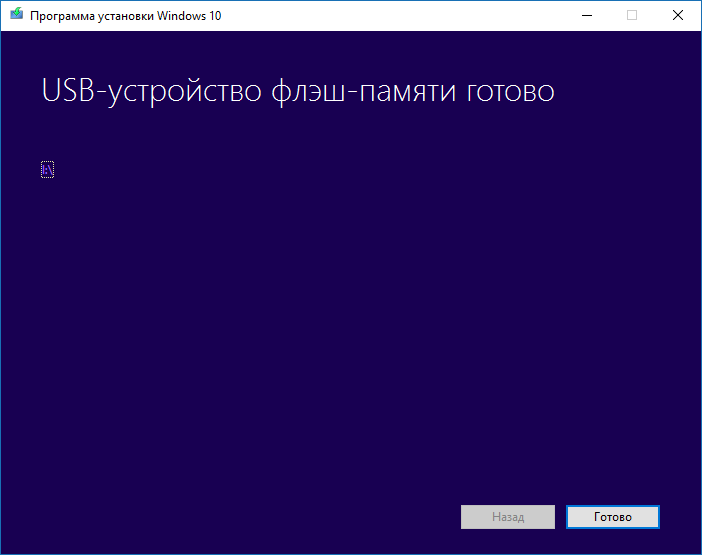
Image 10. Completing the image of the flash drive and closing the program.
Setting the BIOS parameters to download from a flash drive
Quite often on laptops, and especially on netbooks, downloading from a flash drive in the bios is set by default, but you will not make sure that the settings will not be extended.
On most modern computers, the input to the BIOS is carried out by pressing the keyboard keys " F2." or " Delete."Immediately after the start of their download. But for some models of laptops and netbooks, other keys or key combination are prescribed by default. On the table below you can familiarize yourself with the most common key combinations for the entry into the BIOS:
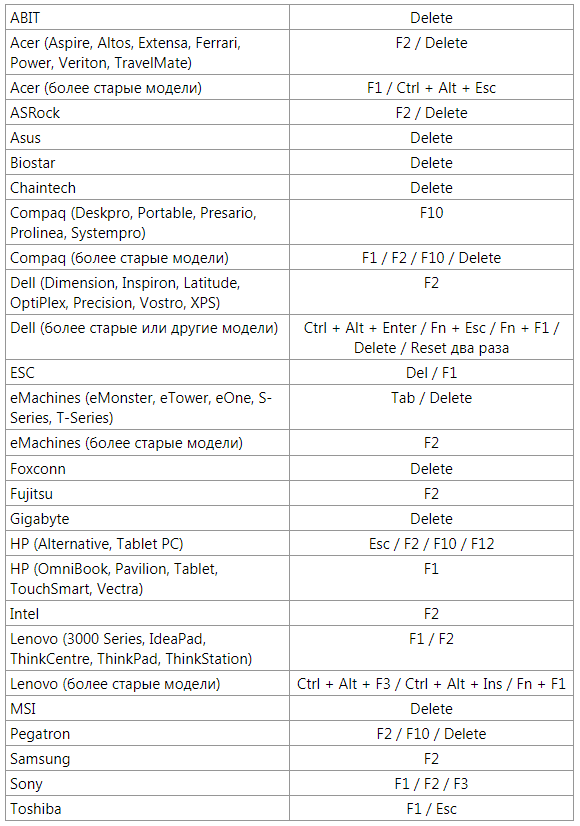
Image 11. Popular keys combinations to enter the BIOS.
There are several versions of bios, which differ from each other appearance and navigation menu. Therefore, the universal leadership does not exist. However, the process of exhibiting the priority of loading in them is almost the same and carried out in the section, the name of which contains the word " Boot.».
Consider this process in more detail in one of the versions of the BIOS:
Step 1.
- Connect your USB flash drive to a computer, restart it and log in to BIOS using the appropriate key or key combination.
- If you are all right, something like this should appear on your monitor. This will be bios.
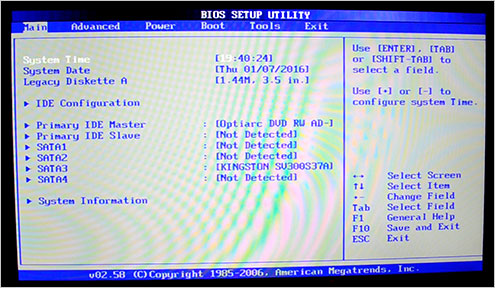
Image 12. Basic BIOS menu.
Step 2..
- Using the keyboard shooter " Left / right»Switch to" Boot.", Arrows" Up down»Stand on the line" Hard Disc Drives." and press " ENTER».
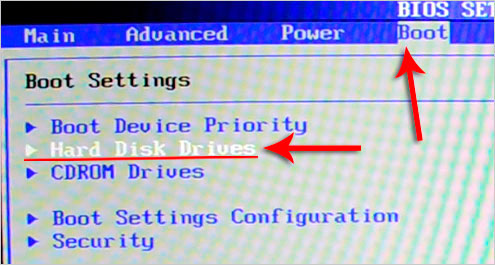
Image 13. Go to the download priority settings.
Step 3..
- Updated window with a list of devices connected to a computer. With the help of arrows, you will need to move to the upper line, click " ENTER", Find your USB USB flash drive in a small window and choose it with the key" ENTER».
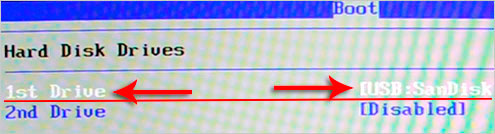
Image 14. Installing the load priority for a flash drive.
Step 4..
- Using the " Escape.»Return to the previous menu, stand up on the line" Boot Device Priority." and press " ENTER».
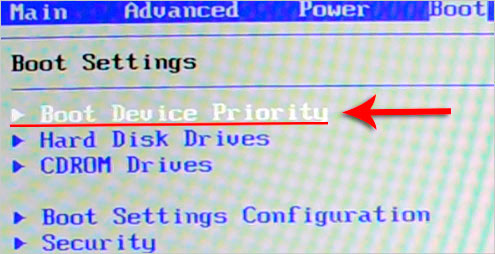
Image 15. Go to the next BIOS settings step.
Step 5..
- In the same way as last time, stand up on the highest line in the section, click " ENTER"And in the discontinuing small window, select your USB USB flash drive.

Image 16. Re-installation priority for a flash drive.
Step 6..
- Now your flash drive is in the first place in the priority of downloads and everything that remains to do is save the changes.
- Press the " F10", In the opening window, stand on the button" OK" and press " ENTER».
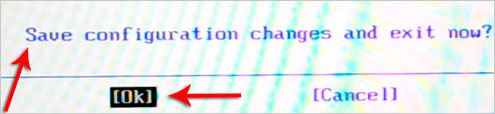
Image 17. Saving parameters and reboot the computer.
Installing Windows 10 from USB flash drive
If you did everything right, then immediately after restarting the computer, the operating system logo will appear on the screen of your monitor. Windows 10.who will serve as a signal that the computer began to read the information from your USB drive and is prepared for the installation of the operating system.
After some time, the logo will disappear and the installation program will start Windows. You have to successively perform the following steps:
Step 1.
- In the first window you will be asked to specify the main language of the operating system, temporary format and keyboard layout. Specify the necessary parameters or leave the default values.
- To continue, click on the "button" Further"And in the next window, click the" button " Set».
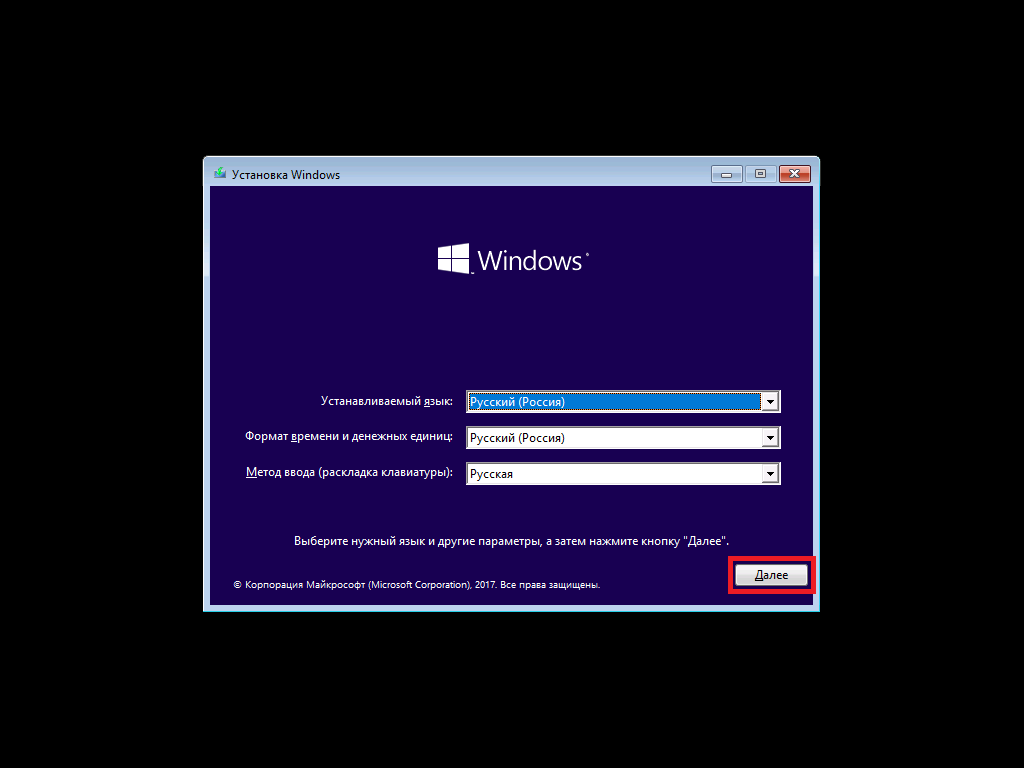
Image 18. Start installation of the operating system.
Step 2..
- In the next window you will be asked to specify the key to activate the license of the operating system Windows 10..
- In the event that the licensed version has ever been on your computer Windows 10., You can click on the button " I do not have a product key"And skip this step.
- If you first install the "dozen" to this PC, enter the license key to the appropriate field and click on the "button" Further».
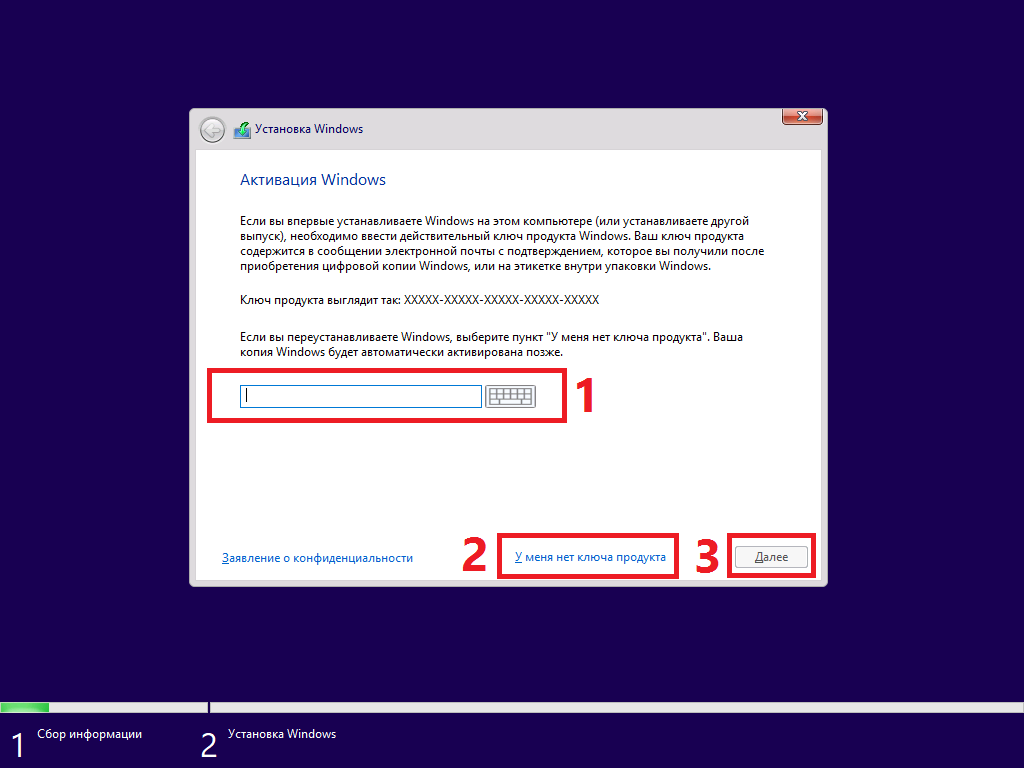
Image 19. Enter key to activate the license.
Step 3..
- At the next stage, you will need to select the edit of the operating system. Choose the one for which you purchased the license key.
- If the key you purchased was for the version " Home", But you select the version" Pro."You will be denied license activation
- To continue, click on the "button" Further"The next window carefully read the terms of the license agreement and accept them.

Image 20. Select the publication of the operating system.
Step 4..
- In the next opening window, the program will ask you to choose the installation method Windows. One of the proposed options is an update of the operating system already installed on your PC. But, since our article talks about clean installation of a licensed copy. Windows 10., Click on " Selective: only installing Windows».
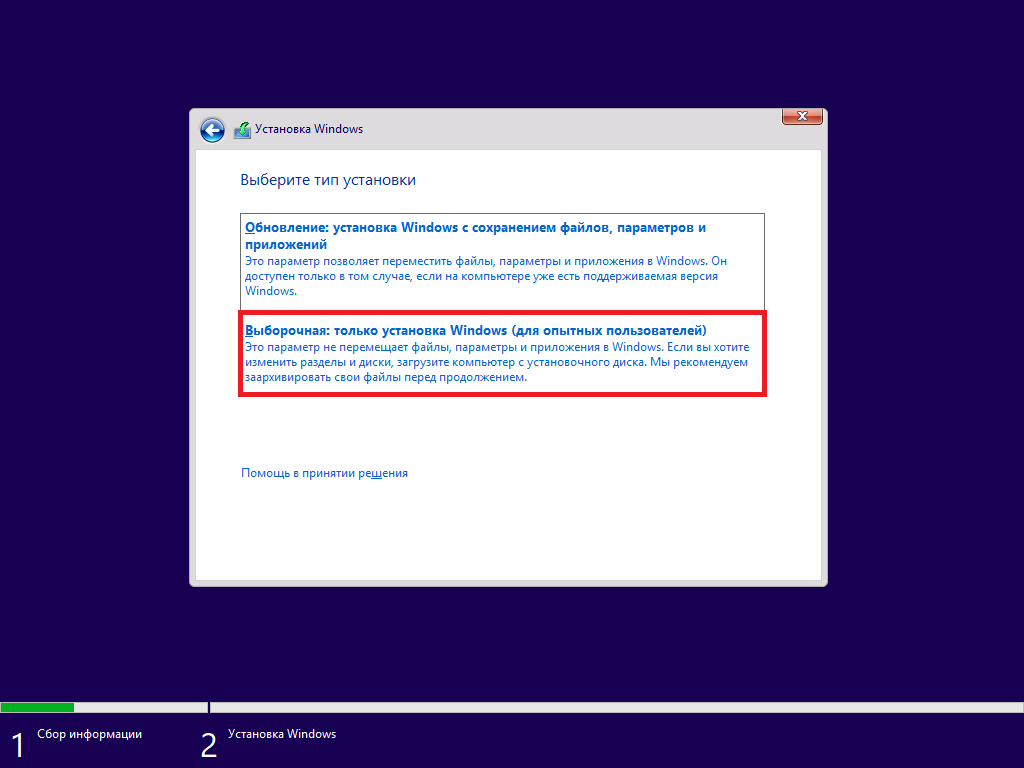
Image 21. Selecting the method of installing the operating system.
Step 5..
- You will reveal the window with disks and their sections. In the event that the installation of the operating system on your computer has not been previously done, the free space will appear in the window, which should be divided into sections. These sections will subsequently be displayed in " My computer»Like Disc C., D., E. etc.
- Under the operating system Windows 10. You should create a section of at least 30 GB. To do this, click on the "button" Create"And specify the size of the future partition.
- The system will automatically create a backup section that should not be touched.
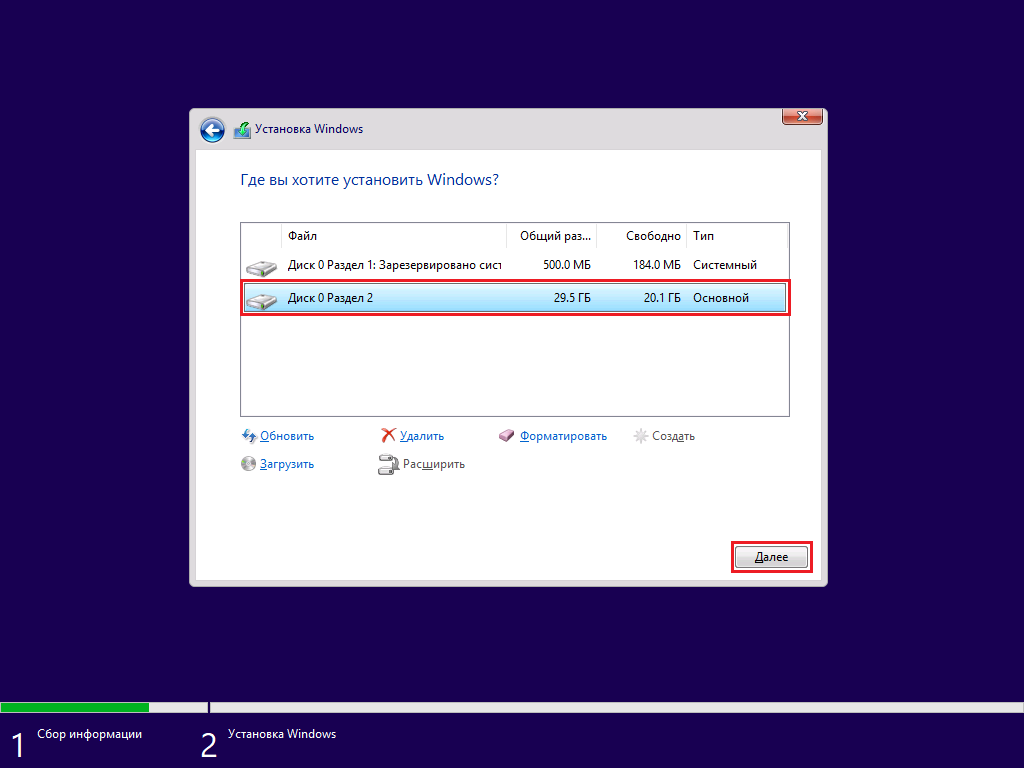
Image 22. Creating partitions for installation.
- If the operating system already has or installed on your computer, then sections under it will be created in this window. Highlight the section, click on the "button" Format", And then on the button" Delete" Do it with all the old sections and create new ones, as described above.
- When you created the required number of disk partitions, select the one that you allocated to install the operating system and click on the button " Further».
Step 6..
- After selecting the system partition, the installation process will start Windows 10.. Do not move away from the computer until it happens its first reboot. As soon as your PC restarts, log in to the BIOS and return all the download priority settings to the original state. Otherwise, the computer will again begin to read the data from the flash drive and starts the installation process. Windows from the very beginning.
- After changing the priority settings in the BIOS, save the changes and after its second reboot, do not touch anything until the installation process is completed and the settings window will not appear.
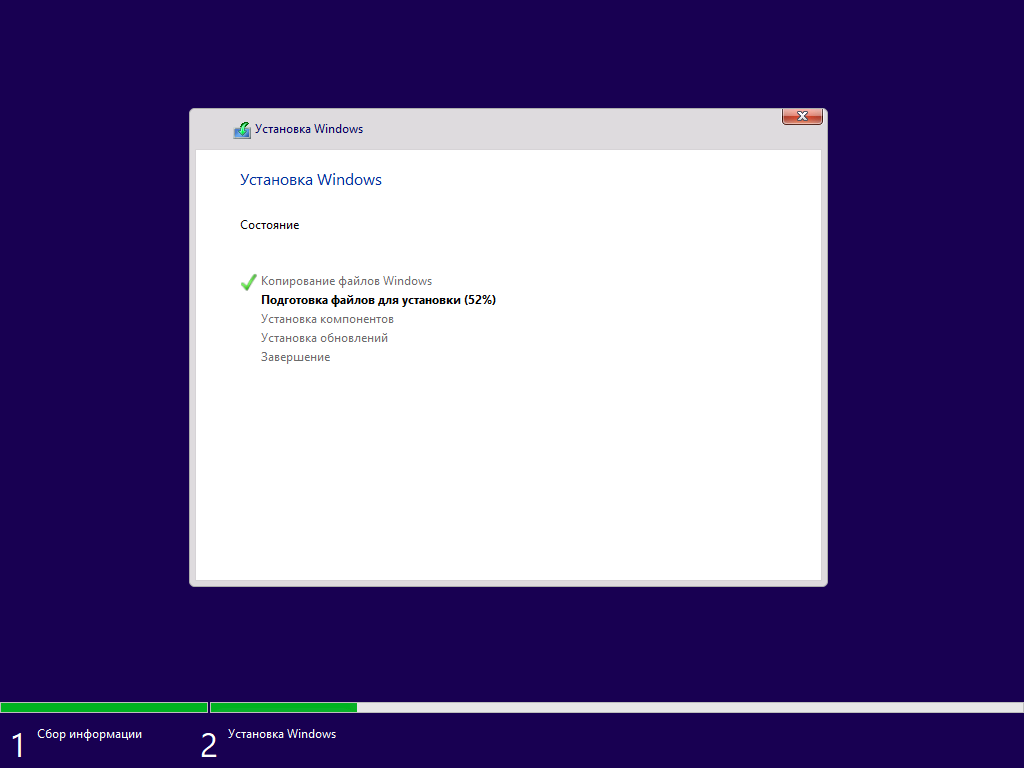
Image 23. Windows installation process.
Step 7..
- After the installation is completed Windows The computer will be rebooted and the window will open on your monitor with the settings of the operating system parameters.
- The first item will be offered to configure the transfer of personal information in Microsoft., automatic determination of your location and much more.
- We recommend at this stage click on the button " Use standard parameters" You can change them at your own discretion in the process of using the operating system.
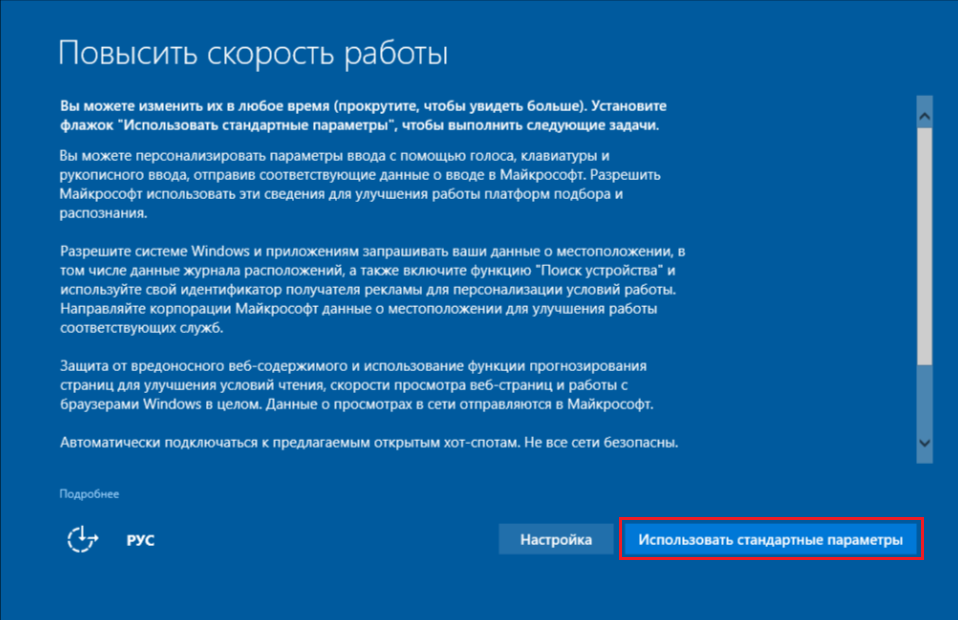
Image 24. The first stage of the system setting.
Step 8..
- At the next stage you will be offered to enter an account Microsoft.. This can be done only if an Internet connection is currently present on the computer.
- However, we recommend clicking on the button " Skip this step"And logged in Microsoft. Later to avoid some failures in the operating system interface.
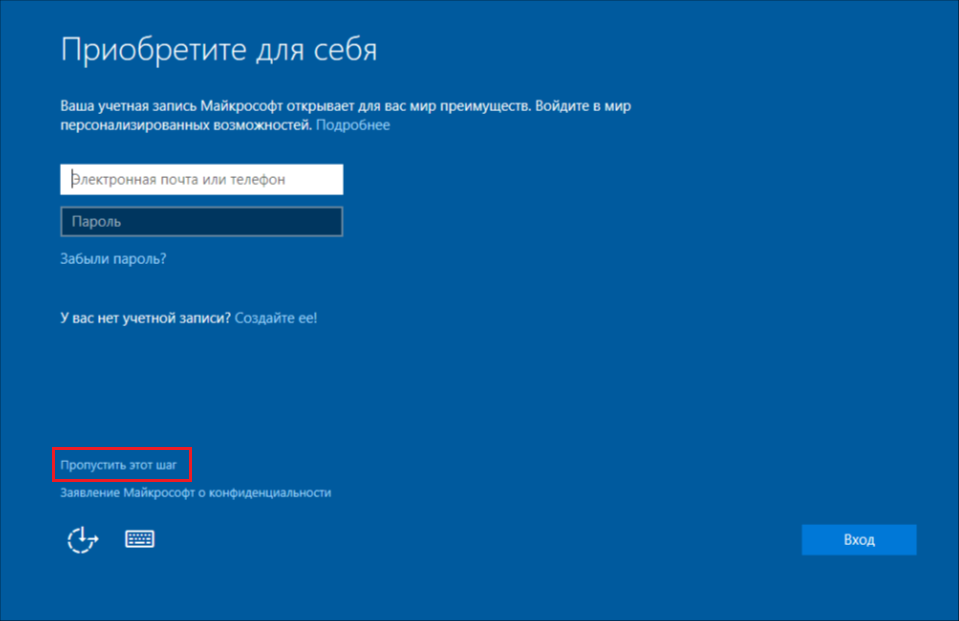
Image 25. Entrance to Microsoft.
Step 9..
- If you listened to the council and click on the link " Skip this step"The windows of creating a local account will be revealed. Enter the appropriate field its name and optionally set the password.
- If you prefer not to install a password for your account, just leave the fields empty and click on the button " Further».
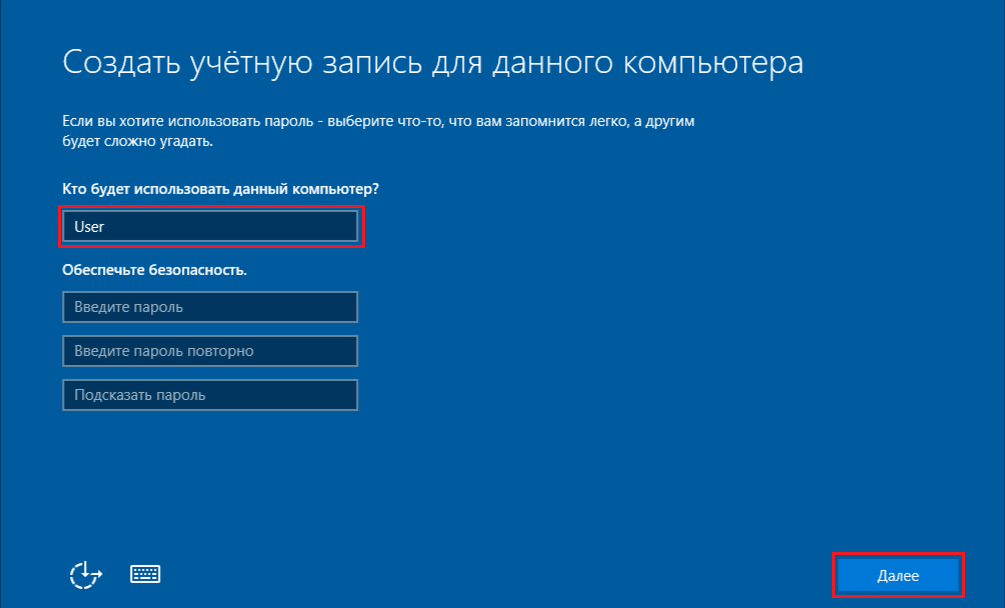
Image 26. Creating a local account.
Step 10..
- The computer will continue to install Windows 10.In the process of which the screen will display the descriptions of the diverse capabilities of the operating system and its useful functions.
- The setting of the installation will be the end of the privilege Windows 10. and the appearance of the desktop.
- Now you can install the necessary drivers and programs, set up the operating system to your taste and start its full use.