
How to transfer photos from the iPhone, iPad to a computer? How to transfer photos from the iPhone to the cloud?
In this article, we will discuss whether the multimedia files from the iPhone or iPad can be transferred with the help of the iPhone or iPad to the computer.
Navigation
- Import photos from iPad on Windows / OS X
- Import photos using iTunes program
- Import photos to cloudy storage icloud
- Video: Phased Multimedia Data Transfer Instructions with iPhone on Computer
- Video: Phased photo transfer instruction with iPhone on MacBook and computer
- Video: Phased photo transfer instructions from iPad, iPad Touch on MacBook and Computer
Surely every user of the device that works on the IOS operating system came across the situation when transferring photos from the iPhone or iPad. Thus, the users had to suffer, and therefore contact the photo processing service centers so that professionals for a certain fee did what the owner asked.
But why apply to service centers if you can do it yourself? After all, as you know, this kind of problem was before updating the seventh version of iOS. Well, after the eighth version of the iOS system appeared, then the owners have the opportunity to use AIRDROP technology, which greatly facilitated the task with the transfer of multimedia files.
Import photos from iPad on Windows / OS X
It is worth noting that all multimedia photos on the iPad device are divided into categories. For example, all photos that were performed using iPad are saved in the section "Photos", and recorded videos are stored in the section "Video".
Thus, thanks to the correct all-system work algorithm, you will never lose your precious photos and videos. Well, computers that work on the Windows and Mac OS X operating system have pre-installed drivers and programs that make the process of transferring and importing images simply and without any effort.
How to import photos and video from iPad on Windows?
So, to make the process of importing multimedia files, you need to adhere to our tips and instructions:
- First of all, you certainly need to connect the iPad device with a computer. You can do this using a USB cable that comes with an iPad device.

- After that, you need to unlock the iPad so that you can remove the protection from writing importing images. Thus, you need to choose in the context menu item "Trust this computer". Using the installation of such a function, the computer to which your iPad is connected will have access to all multimedia data (photos, video recordings, music, contacts, notes, other files).

IMPORTANT! When connecting the iPad device to a new computer, you should always unlock iPad, that is, choose a function "Trust this computer."
- Then you will need to make some actions on Windows. So, press the left mouse button on the icon "A computer"After that, you will see a file manager in which the name of your iPad device will be displayed.

Tip!To reduce the procedure for displaying a file manager, you can also press the keyboard shortcut. «Win "+"E ".
- Then you need to right-click on the iPad device in order to select a function. "Import photos and video". After you have selected the import of multimedia, then a Windows computer, and more precisely the import wizard will launch the scanning process of your files that are located in your iPad memory. Therefore, if you have a lot of photos and video recordings, the scanning process can take from 30 minutes.

IMPORTANT! Users have come across such a situation where the import wizard on the computer did not find multimedia files, although they were on the iPad. The reason for this was the fact that users simply forgot to unlock the iPad before importing file imports.
- Now you need to sort all multimedia files, that is, choose which type of files you need to import to the computer. Thus, you have the opportunity to import photos, videos, music, contacts, notes. When you decide on the selection of files, you should click on the button. "Further".
- If you need to choose two or three images out of ten, then you can mark the necessary images by a check mark, and only after clicking on the button "Further".

- In the process of import, you can easily find the desired photo, or if you are interested in importing photos for individual dates, for example from March 1, 2017 to March 10, 2017, then you can specify them in the appropriate field.

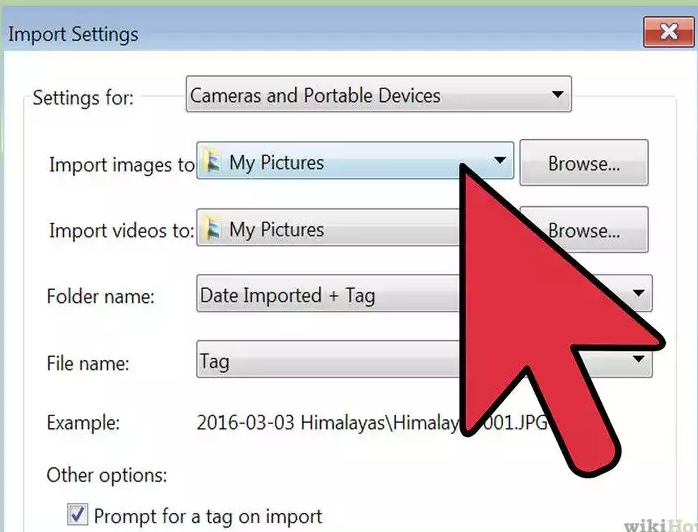
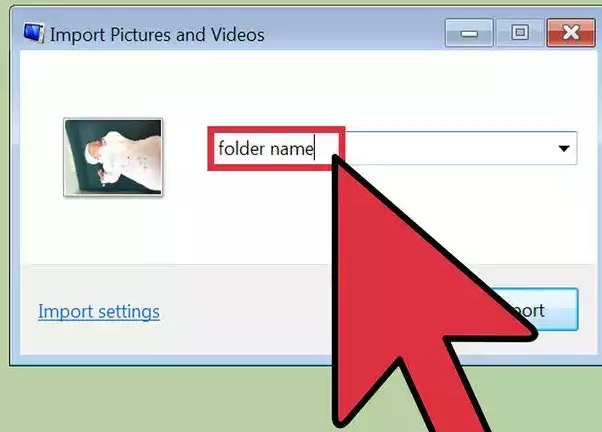
- When you decide on the selection of the dates range, then during the import stage, you will need to specify the name of the folder to which all pictures will be imported. If you want to move pictures to the desired folder, just specify the path to the directory with this folder.
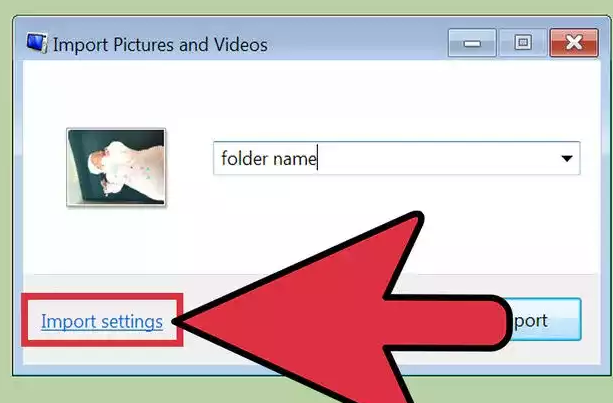
- By default, photos and files with PNG, JPEG, GIF, RAW format are saved in the folder "Images". But using import settings, you can select the preservation of images to another place or folder. Thus, in order to change the path of saving photos, you need to click on the button "Overview".
- After you have dealt with the import settings, you have chosen directory and folder, now you need to click on the button "Import".
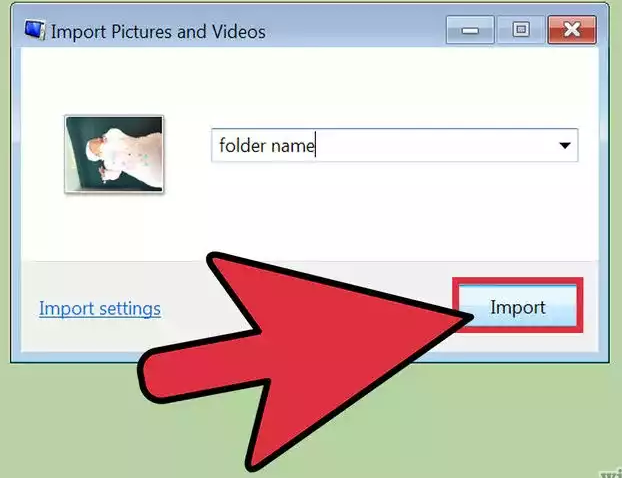
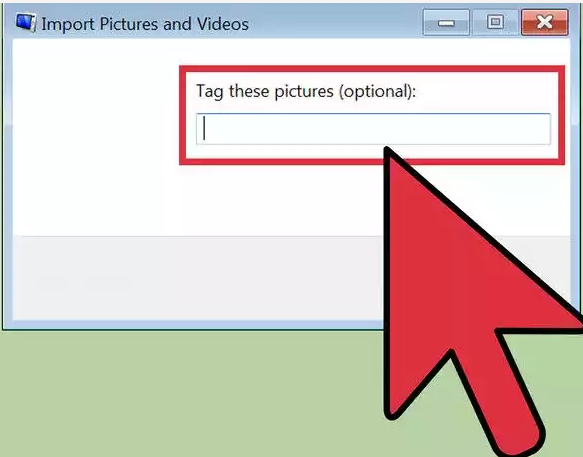
- In the process of importing the program will offer you to enter tags for photos. Therefore, if you are not interested in tags, or you are not needed at all, then just leave the field for the tags empty.
How to Import photos and video from iPad on Mac OS X?
So, to make the process of importing multimedia files, you need to adhere to our tips and instructions:
- First of all, you certainly need to connect the iPad device with MacBook. You can do this using a USB cable that comes with an iPad device.

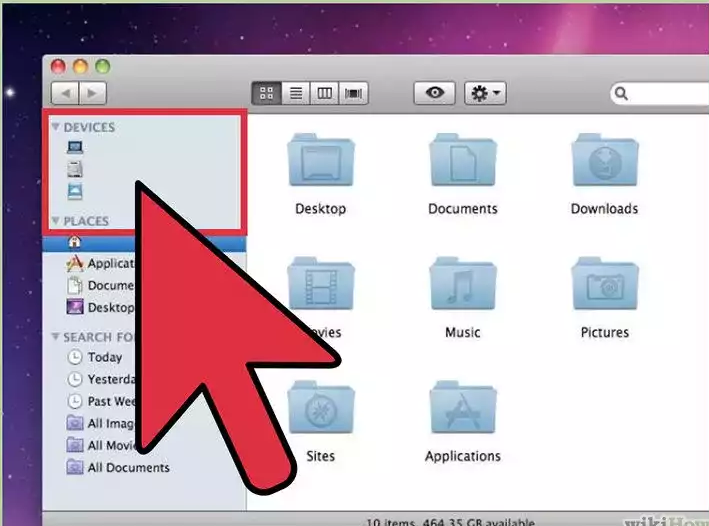
- After that you need to open the program on McBook, which is called "Capturing images", The program is located in the main control center "Programs".

- Then you will need to select your iPad in the device list, and you can select the selection using the left column that is located in the list. But if your iPad is not in the list, even when you have connected a USB cable to it, you most likely forgot to enable it and unlock.
- Now you need to decide on the folder directory, that is, where your multimedia files will be imported. For example, if these are photos, they will be imported into the default folder called "Images". But if you want to choose another folder to import, then simply click on the button "Import in",and then select the desired folder.

- Decide whether you need to leave imported photos on the iPad device after the import process is over. Note that the default settings provide for deleting photos from the iPad that have been imported. But you can prevent the removal of imported photos, for which you need to open the menu, and in the settings, remove the checkbox from the point "Delete after imports."

- If you need to import two or three photos, simply select them by holding the command «Command ", and then click on the button "Import". Well, if you need to import all photos that have on your iPad, you should click on the button "Import everything."

- If you launched the process of importing all photos, then you need to wait for a certain amount of time. It is worth notingthat import duration depends on the number of multimedia files on the iPad.

Import photos using iTunes program
How to transfer photos from the iPhone?
So, I would like to immediately note that the way of importing photos from the iPhone to the computer is pretty easy. After all, it is easier to work in the iTunes program. Moreover, after connecting the iPhone 4, 4S, 5S, 6, 6S, 6 plus, 7 and 7 plus with a computer using a USB interface, the iTunes program opens in automatic mode, which again does not require additional actions.
In order to transfer photos to a computer with iTunes, you need to adhere to our tips and instructions:
- First of all, you need to connect the iPhone device to your computer using a USB cable, and then you want to enable the iTunes program.
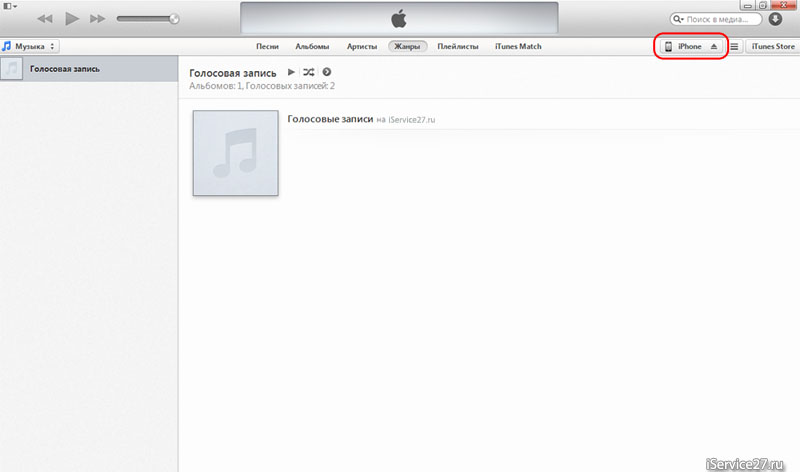
- When the process of connecting two devices was completed, you will need to find your device in the iTunes program, and click on it, and then you need to go to the section "Photo".

- After that you need to click on the tick "Synchronize photos from"And then select the folder in which you need to import all photos. If you need to import more and videos, then check the checkbox "Enable video synchronization".
- Then, when decided on the settings, you will need to click on the button. "Apply",after that, the process of importing photos and video starts will begin.
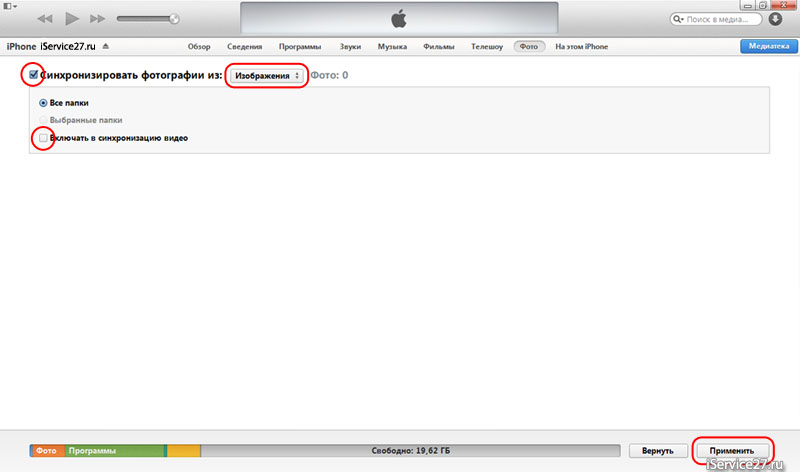
- Ready! Photos and videos were imported into the folder you specified in the import settings.
How to transfer photos from iPad?
In order to transfer photos from the iPad to a computer with iTunes, you need to adhere to our tips and instructions:
- First of all, you need to connect the iPad device to your computer using a USB cable, and then you want to enable the iTunes program.
- When the process of connecting two devices was completed, you will need to find your device in the iTunes program, and click on it, and then you need to go to the section "Photo".
- After that you need to click on the tick "Synchronize photos from"And then select the folder in which you need to import all photos. If you need to import more and videos, then check the checkbox "Enable video synchronization".
- Then, when decided on the settings, you will need to click on the button. "Apply",after that, the process of importing photos and video starts will begin.
- Ready! Photos and videos were imported into the folder you specified in the import settings.
Import photos to cloudy storage icloud
How to transfer photos from iPhone to cloud storage?
It happens when the place is running out on the iPhone, and there is no laptop and a computer to which multimedia files could be imported. Then the cloud storage or so-called icloud comes to the rescue.
So, if you want to import your photos on iCloud, then you need to adhere to our rules:
- First of all, you need to go to the section "Settings", after click on the point «icloud ", and then click on subparagraph "Photo" And translate it to an active position with a slider. Do not forget to activate subparagraph "Mediamatkaicloud ".

- Then, when you fully activated the cloudy storage of ICloud, all your multimedia files in automatic mode are loaded to the server of your cloud.
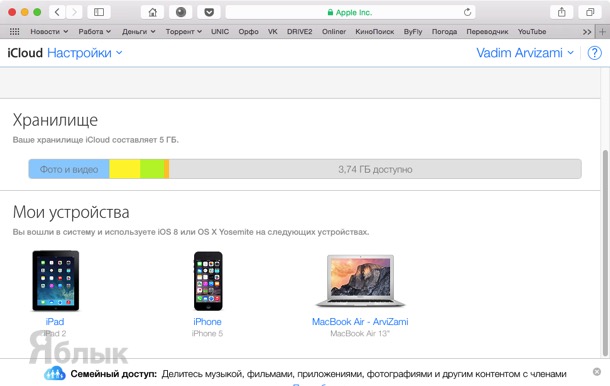
- If you decide to see the downloaded photos and videos on the cloud storage, then you need to go from a computer / laptop to official site icloud..
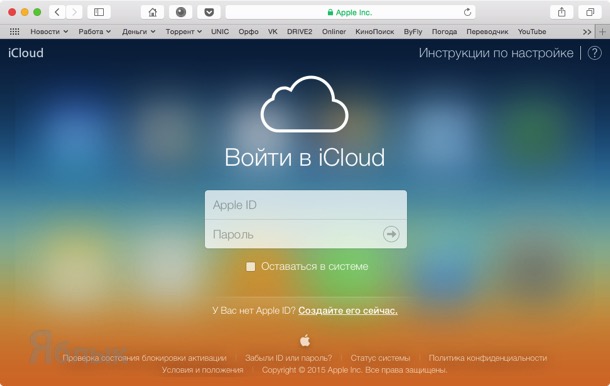
- Now you will need to log in in the system, using data entry from your Apple ID account, and after authorization passes, you need to click on the label "Photo".
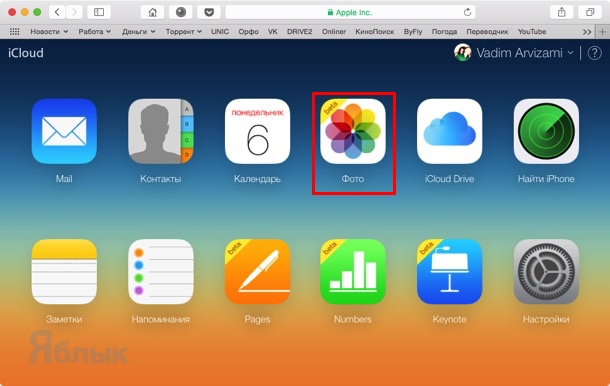
- After you pressed on a label "Photo",you will need to wait a few minutes so that the server or cloud storage makes sorting and preparing files for viewing. If there are a lot of files, the sorting and file preparation procedure can take up to an hour.
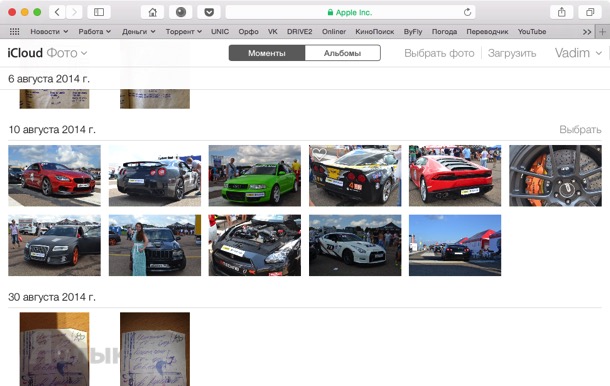
- When you get to the section "Photo"Surely notice that the interface on the computer is similar to the iPhone interface. Now you have the opportunity to upload, delete and download photos to the computer.

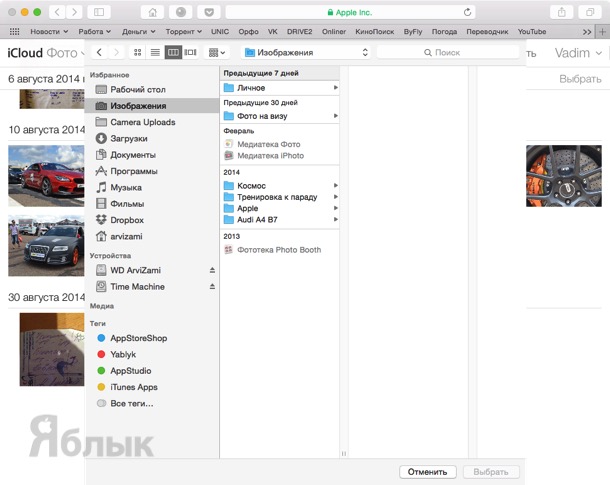
- If you decide to upload photos to the cloud, then you can do it with usual drag and drop. But do not forget that the place on the cloud has a limit, so for example, if you have a standard, then you can download only 5 GB to the cloud.
How to transfer photos from iPad to cloud storage?
It is worth notingAs the iPad often arises the situation that the place of internal memory ends. Therefore, the cloud storage comes to the rescue.
So, if you want to import your photos on iCloud, then you need to adhere to our rules:
- First of all, you need to go to the section "Settings", after click on the point «icloud ", and then click on subparagraph "Photo" And translate it to an active position with a slider. Do not forget to activate subparagraph "Mediamatkaicloud ".
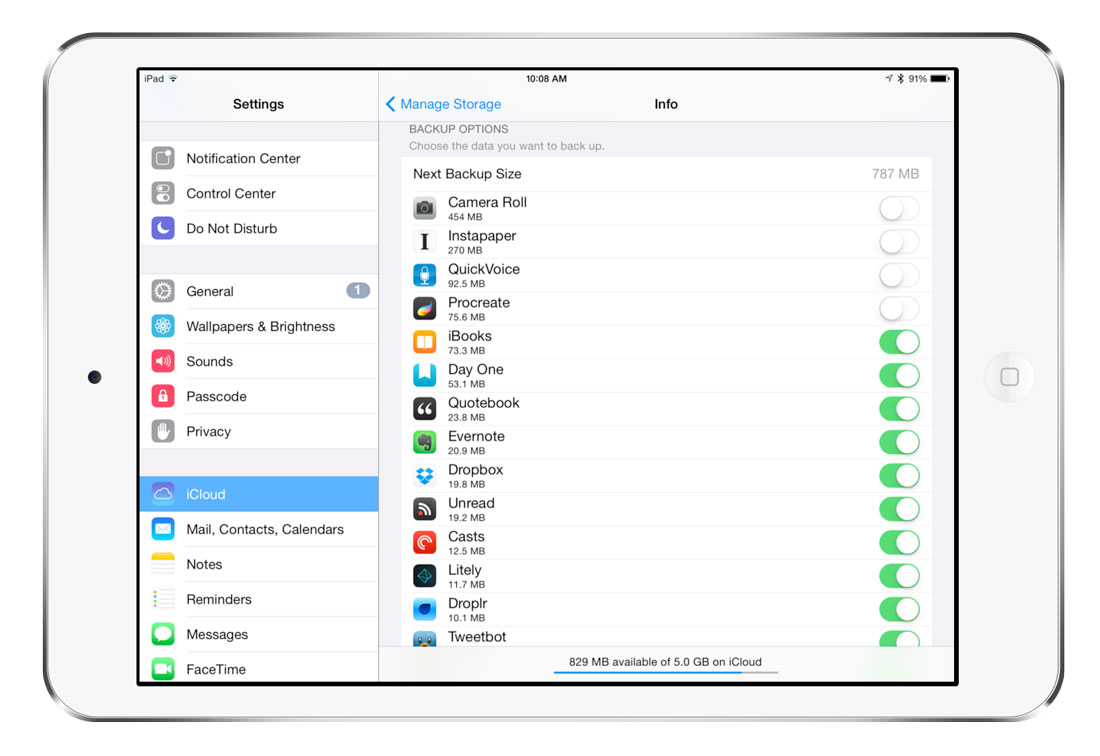
- Then, when you fully activated the cloudy storage of ICloud, all your multimedia files in automatic mode are loaded to the server of your cloud.
- If you decide to see the downloaded photos and videos on the cloud storage, then you need to go from a computer / laptop to official site icloud..
- Now you will need to log in in the system, using data entry from your Apple ID account, and after authorization passes, you need to click on the label "Photo".
- After you pressed on a label "Photo",you will need to wait a few minutes so that the server or cloud storage makes sorting and preparing files for viewing. If there are a lot of files, the sorting and file preparation procedure can take up to an hour.
- When you get to the section "Photo"Surely notice that the interface on the computer is similar to the iPad interface. Now you have the opportunity to upload, delete and download photos to the computer.
- If you decide to upload photos to the cloud, then you can do it with usual drag and drop. But do not forget that the place on the cloud has a limit, so for example, if you have a standard, then you can download only 5 GB to the cloud.
Well, today we reviewed ways to transfer multimedia files with iPhone and iPad to the Windows and Mac OS X computer. Therefore, we hope that this article helped you solve the problem with the import of photos and video recordings.