How to configure iPhone: instructions for "kettles" in Russian
In this article you will learn how to configure the Apple iPhone gadget.
Navigation
Most of the owners who have only purchased the new iPhone smartphone are faced with difficulties and problems when setting up a gadget, and some of them do not know what to do with it, and how to use it.
It should be noted that if you are a beginner "Applodod"You would not prevent you from turning to the advanced owner of the iPhone smartphone so that they in turn explained how to work with the phone in the future.
Therefore, today, as you understand, we will talk about how to properly configure the new iPhone, so that in the future there are no problems and questions about this.

What needs to be configured first when buying a new Apple iPhone?
So, when you just purchased this device, you need to make settings, namely:
- General settings
- Create an account on the Apple ID service
- Connect cloud information storage
- Install the password and propagate Touch ID
- Change useful iPhone settings
- General iPhone settings
Well, let's imagine that you bought a new iPhone, arrived home, opened the box and got your desired device from there.
General settings
What do you need to do?
- You need to turn on the iPhone, simply by clicking on the power button, after which the greeting will appear on the screen, which you want to remove through the swipe, and then go to the language and interface selection step.
- The next step you will need to choose your country, and then you will receive an offer in the form of connecting and selecting the Wi-Fi access point.

It is worth notingthat all these settings are not so mandatory, but still in the future they will still need to produce. Therefore, if you want to skip the setting, simply press the button "Further".
- After you connect to your home access point Wi-Fi, you will be asked to enable or disable location and geolocation services.
Important! The work of the services relating to the location and geolocation is carried out by the main GPS module that is responsible for this function. Therefore, if you activate it, your smartphone will start tracking your location, and will also use your area maps, and receive weather conditions in your area or city.
Remember! When you turn on the gps of the sensor, you are very strong losing the life of your smartphone without recharging. Therefore, always disconnect it, and try to use only if necessary.
- In principle, when setting up a new iPhone, the location and geolocation service is not so important. Therefore, it can still be configured. Thereby press the button "Disable"and then confirm it with a button "Yes"So that the work of this service is discontinued.

- Now, when you were determined with the geolocation setting, I missed it at all, then other gadget settings will appear on the screen of your smartphone. Due to the fact that we are configuring a new iPhone, then we need to click on the string "Set up like a new iPhone".

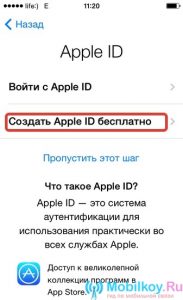
Create an account on the Apple ID service
This process More important of all that concerns the setting of the gadget. Therefore, be careful when creating an Apple ID account.
- So, when you switched to this stage of the settings, you need to click on the inscription "Create Apple ID Free".
- After that, you will need to enter your personal data, including date, month and year of birth.
Important! If you are a little "applet", which has not yet been 18 years old, then the Apple ID system will refuse you to register. In this connection, always indicate age at least 18 years.
- Now that all data is filled, you will reinforce you on the stage of introducing your email, where you need to click "Use the current. E-mail. "
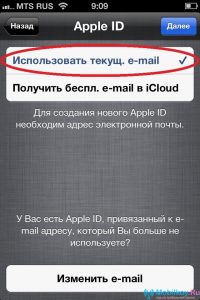
- In field "EL. post office" You will need to enter your e-mail or mailbox.

- Then come up with your password, which will later be used to log in to the Apple ID system, and then confirm it.

Important! The password that you came up should consist of a combination of at least 8 characters, because if you enter a 6-character password, the system will consider it as "Enter password".
- The next step you will need to establish a control question, the answer to which later will help you restore the password from the Apple ID system, if you forgot it for any other reason.

Tip! The answer to the control question is better to record in a personal diary, or write on a piece of paper, and then put it in the box of your iPhone.
- Now that the control question is installed, and the answer is recorded, you can go to the next setting step in which you will be prompted to enter a backup postal address. Again, this is necessary in the case when you forget the password from Apple ID.
- After that you will go to the section "Updates"in which you will enable or disable all subsequent updates.

- Now you have to agree with the rules, including with the license agreement, which is prescribed by Apple.
It is worth notingthat this step is a prerequisite for working with a smartphone, since it is impossible to refuse it, you just need to click on the button. "I accept".

- Ready! Basic and general iPhone settings are made.
Connect the cloud storage of information
Well, note that after you have completed the first step regarding registration in the Apple ID system, you have already become part of this company, thereby allowed to configure the cloudy ICloud storage, where the backup copy of your smartphone will be located, including settings , Data and information on the accumulator.
- Again, this item is not necessary, but preferably.
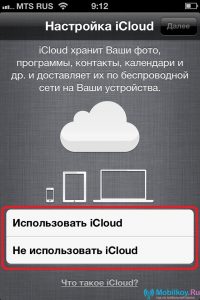
Tip! Experienced iPhone smartphone owners recommend clicking on the button "Use ICloud"For without it, you lose a huge number of functional qualities of your gadget.
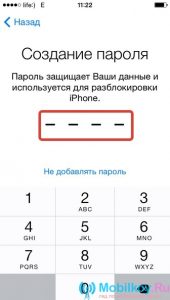
Creating a password and diagnostics Touch ID.
If you purchased the iPhone 5S, then in the next window, in addition to installing the password and configuration of the Touch ID, you will be asked to set the device lock using a fingerprint.
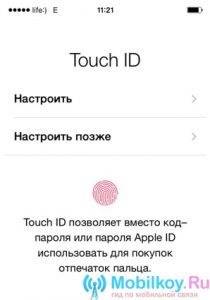
- Now you need to attach your index finger to scan to a scanner, which is located at the bottom of the screen, that is, in the button "Home". When the scanning process is over, you will be offered a subsequent installation of passwords for blocking the device.
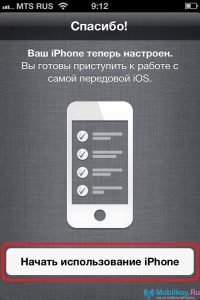
- Then you remained to perform the final stage, which is to accept the agreement, concerning sending data to the diagnostics of your iPhone directly to Apple. The choice of the agreement is behind you, so decide yourself, send this data or not, but we advise them to send them.

- After completing the stage of sending data to the diagnostics of the device, you will move on the next window in which you need to click on the button. "Start using the iPhone".
Using useful iPhone settings
This procedure You need to make if you are very often using the phone, both to access the mobile Internet and for use it as a modem or router.
Therefore, in order to use the mobile Internet on the iPhone, you need to follow our instructions:
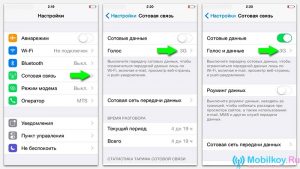
- First of all, you need to insert your chip or SIM card into your iPhone, and then go to the section "Settings".
- Now you need to go to subsection "Cellular"where necessary in the column itself "Cell data" Include the Internet, just translating the slider to the right.
It is worth notingthat all the settings for working with the Internet come immediately as soon as you insert the SIM card into your device. Therefore, you can only save them in the phone.
Well, in order to use the iPhone as a modem or router, you need to follow our instructions:
- First of all, you need to go to the section "Settings".
- Now you need to go to subsection "Modem Mode"where you just need to move the slider to the right so that it turns on.
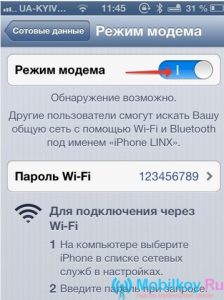
- When everything is done, as you need, your iPhone will start doing work as a modem, thereby on the screen you will see a blue strip, meaning that the wireless connection functions.
So, as you can see, the apple iPhone gadget is not so complicated. But still most users still have any misunderstandings that we hope today decided. Therefore, configure your iPhone, and use it right!